Took out a few remaining things on the car's interior. Nothing photo-worthy. Took the heater core assembly out, the wiring harness, and the steering column and pedals (brake pedal is still in there, though).
No new rust, but something has to be done about the pockets at the bottom of the cowling. They're clear full of dead leaves and dirt and crap. I'm going to have to figure out how to drill some relief holes, so that stuff doesn't collect there anymore.
The next step is to wire wheel some questionable areas and verify whether or not they have to be repaired. I don't anticipate much. At first glance, the inside wheel houses on the back look OK. Which is really good, and really unexpected. Outside wheelhouses are just as jacked as the quarter panels, and will have to be replaced.
The little kerosene garage heater works pretty good. Wasn't cold at all out there--although it was a pretty nice day outside, anyhow.
I also jacked the car up another 8 or 10 inches in the rotisserie. That will make rotation a little easier, and make the job overall a little easier. Jacking it up was simple. And it allowed me to center and tighten the brace between the rotisserie stands.
One of the next things will be to wirewheel out the rest of the insulation--which will all be replaced with nice modern stuff. Once that's out, I will start on the floor panel repair I mentioned earlier in the blog.
Tuesday, December 27, 2011
Saturday, December 17, 2011
garage heater
Been cold as a witch's tit in a brass bra out here lately. I picked up a small kerosene indoor-safe (?!) heater. I'm not sure it will belt out enough heat, but it should be good. Except the cold air blows through that garage like the walls aren't even there.
Hopefully the heater will do the job. I'd hate to have to put things off until the weather warms up, but it's just too darn cold to work in that unheated garage.
The unit I got was the small 10,000 btu DynaGlo heater, from Lowe's.
Hopefully the heater will do the job. I'd hate to have to put things off until the weather warms up, but it's just too darn cold to work in that unheated garage.
The unit I got was the small 10,000 btu DynaGlo heater, from Lowe's.
Wednesday, December 14, 2011
It's a sad, sad day
After more than a year without interwebs at the house, I finally had to break down and do it. Got the CenturyLink up and running just now. It feels good, it feels bad. But it was just so darn inconvenient having to run around town to take care of all the diddly-crap online stuff we have to deal with these days.
Good news: I'll be able to post some of the car's build-up in almost real time. This is good, because from here on out, the car is almost all build-up. The teardown is 99% complete.
Good news: I'll be able to post some of the car's build-up in almost real time. This is good, because from here on out, the car is almost all build-up. The teardown is 99% complete.
Monday, December 5, 2011
Up, up and away!
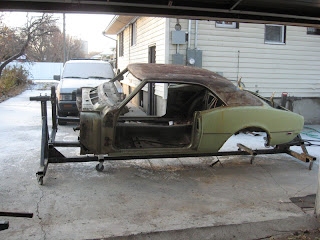
Here are some shots of the car on the rotisserie. It's easily wheeled in and out of the garage, and very simple to reposition the body. I do need to jack the whole thing up about 6 to 10 more inches, to make it just a hair easier to spin and work on the underside of the car. And I need to make some minor adjustments to the long connecting bar.

Just another view, looking out of the garage.
And a view of one of the attachment points on the rear leaf spring shackle. I will have to make some kind of arrangement to work on the attachment area, as there will be some repair/reconditioning needed under there. It may end up swapped up to the bumper, or I may see if one mount will hold while I work on the opposite side. I'll just have to see when I get to that point.

It was an incredible feeling wheeling the car out on this thing. The rotisserie is worth every penny, and every minute of time.
Next up: working on the trunk, quarters and roof. I will be hitting everything with the wire wheel to make an assessment of necessary repairs, and coming up with a plan of attack. There are still some minor parts that need to be stripped out, and I'll be spending some time digging all the old insulation, padding and dirt from the interior. But really, that's not even an afternoon's worth of work. I think the most important thing now is to assess the quarter panels and rear wheel houses. Most likely all of that will have to come off the car and be replaced. Question is, do I do that first, or the roof first. Questions, questions. . .

Just another view, looking out of the garage.

And a view of one of the attachment points on the rear leaf spring shackle. I will have to make some kind of arrangement to work on the attachment area, as there will be some repair/reconditioning needed under there. It may end up swapped up to the bumper, or I may see if one mount will hold while I work on the opposite side. I'll just have to see when I get to that point.

It was an incredible feeling wheeling the car out on this thing. The rotisserie is worth every penny, and every minute of time.
Next up: working on the trunk, quarters and roof. I will be hitting everything with the wire wheel to make an assessment of necessary repairs, and coming up with a plan of attack. There are still some minor parts that need to be stripped out, and I'll be spending some time digging all the old insulation, padding and dirt from the interior. But really, that's not even an afternoon's worth of work. I think the most important thing now is to assess the quarter panels and rear wheel houses. Most likely all of that will have to come off the car and be replaced. Question is, do I do that first, or the roof first. Questions, questions. . .
Saturday, December 3, 2011
Got it!
Got the car up on the rotisserie last night. It was cold, dark and nasty, but I got 'er done.
The rear brackets worked perfectly, but it was a little dicey getting the car jacked up high enough to attach them to the rotisserie. I think in the future, I may make a longer vertical adjustment arm, just to have around.
I wheeled the car out of the garage this morning, and the rotisserie makes for very easy handling. This was such a good idea, and is working out so well, that I'm suspicious. Things never work this good.
Today I'll be cleaning out the garage, moving a bunch of the car parts into my basement, and organizing my work area. Then I'll get to work cleaning up the car, getting the old undercoating off, and getting a plan for the roof and rear quarters.
This is the coolest damn thing. I don't know why, but I am ALL geeked up about it.
Pictures to follow in my next post.
Friday, December 2, 2011
Half full, or half empty?
I have the front part of the rotisserie finished and attached to the car. It works perfectly, so far. Attachment was simple, and the mount is solid. The picture you see here is without the safety pin, which I added last.

Picture of the safety pin, and the verticle adjustment.

A side view of the attached rotisserie.

The front mounts are very simple. I just cut the ends at a 45 degree angle, and welded in a small piece of 1/4" stock. The picture here doesn't show it, but all I had to do then was drill a hole for the bolt. The bolt fastens directly to the castle nut in the front subframe mount.

One thing I have had to do is re-tap the nuts that I've welded on for the stop bolts. The heat from welding distorts them just enough to make it difficult to turn the bolts in. It's a quick, and easy process to re-tap.

The last thing, which you may have noticed from the first picture, is a peg to hold the 3/4" wrench for the stop bolts. I simply drilled a hole in the side of the rotisserie, dropped in a large steel nail, and tack welded it in place. Makes a perfect little hook. I may add at least one more to both sides of the rotisserie, so there's a place to hang the safety pin as well.

All in all, this is turning out great. I have the rear mounts to build up, and then the body will be up and ready for cleaning and repair. It's very exciting.
On the rear, I am reconsidering mounting to the bumper brackets. I think I will mount to the rear leaf spring shackle mounts instead. It just looks easier than fabricating a mount for the bumper brackets, and may be more secure.
With the rear wheels on, the front rotisserie rolls very easily, even on my rough garage floor. Moving it around when the whole thing is up and ready is going to be a cinch.
If all goes well, I should have this part of the buildup wrapped up this weekend, and I can move on to actually working on the car again, removing the old undercoat, repairing the two spots on the floorpan, etc. . .
One other thing I didn't mention was welding in body supports. I've seen conflicting recommendations out on the web, so I may skip some of it and move on. I will have to weld in supports before I cut out the roof and quarter panels, but I may not have to do it just now.
Monday, November 21, 2011
Just About There
OK, I have the rotisserie about 95% complete. I finished the pivots, and got started on the brackets for the car. I need to make some adapters for the brackets, so the front end will connect via the subframe mounting points on the cowling and the rear will connect via the bumper brackets.

All in all, I think the rotisserie is grossly overbuilt, but that's OK. We'll see how it works on the car.

I still need to fab up the height adjustment bars, but that should only take a minute or two. I also need to cut the connector bar to length, and get the pin bolts set up for that as well. Hopefully after Thanksgiving I can get it finished up and get the car up on it.
I'm also going to fabricate an engine mount to have the ability to use one of the rotisserie tripods as a motor/transmission stand. They're more than stout enough. In fact, I think they could be adapted to be used for all kinds of different stand-related functions. We'll see how that goes. I'm quite a ways off from any engine work yet.
Wednesday, November 9, 2011
Rollin'
Got the casters on the rotisserie, and prepped the frames for painting. I still haven't got the brackets built for the car, but the steel is sitting there waiting on me.
I probably won't get a bunch done this weekend, as I'll hopefully be running the gas line to my fancy Samsung dryer that's been sitting on my basement floor for a year. It'll be nice to get that thing finally hooked up.
Hopefully I'll be able to give the rotisserie a good coat of POR-15, and at least get started on the brackets. Pictures will follow shortly.
Friday, November 4, 2011
A Fool and His Money are Soon Parted
Well, I feel like an idiot. Metal Supermarkets was such a great store for the round tube for the rotisserie, that I decided they deserved my business for the rest of the steel for the brackets. Turns out, they are great for smaller odds and ends, but pretty bad for regular lengths. I ended up paying about double on two 10' lengths of 2.5" square tubing.
Makes my stomach hurt. $100 down the tubes. Shit.
I still like that store for odds and ends. But next time I will go with Wasatch Steel or Metalmart for the other stuff.
Makes my stomach hurt. $100 down the tubes. Shit.
I still like that store for odds and ends. But next time I will go with Wasatch Steel or Metalmart for the other stuff.
Monday, October 31, 2011
Rear window rails
One of the small things I have going on the side, while I work on the rotisserie, is some small detail stuff. These are the galvanized steel window rails for the rear quarter windows. They never have rolled up and down too good, so I took some sandpaper and smoothed out the rails. I then cleaned them thoroughly, and coated them with POR-15. They look much better than they ever did, even at the factory. I am likely going to do this with as much of the interior window hardware as I can.


More Rotisserie Fun
Got some great work done on the rotisserie. It's almost done, I just need to build up the brackets to attach the car, and get some casters on the thing. The pic below is one of the basic stands, minus the pivot and casters.

It's not too pretty, here at the end. My pivots are going to be solid, but the retaining rings on the back aren't the greatest. But it's going to be a solid piece of equipment.
I burned out my cheap Harbor Freight drill, and ended up going to Lowes and picking up a replacement. I also decided that cobalt drill bits are a waste of money for this kind of work. I snapped several of them, and the black oxide replacements I bought worked every bit as well on the mild steel.
So, if all goes well, I'm going to try and have the car on the rotisserie by the end of the weekend. I need to take some time off to get the casters and the rest of the steel I need to finish the brackets. I basically need about 24" of the 3" square tube, and a quantity of 2.5" square tube.
I welded the rings onto the rotating 'pins' by setting them on my steel table, and placing the ground clamp near them. It worked perfectly, conducting plenty of juice to get a solid weld. You can see a finished one in the back, and one of the tack welds on the front piece. I just eyeballed the spacing, but I got it pretty darn close to perfect. The space left plenty of room to get good penetration, and a solid weld.

Here you can see the top of one of the stands, with 1/4" pilot holes drilled. I drilled these out to 9/16", to accommodate the 1/2" bolts I'll use as stops. That's how I murdered the Harbor Freight drill.

Below you can see the sloppy welds and crooked bolts on. I have these perfectly lined up on the other one, believe it or not. Looks like hell, but it will work OK.

And below, you can see where I drilled and tapped a hole for a zerk fitting on the side, for a little bit of grease. May not be necessary, but it sure won't hurt anything, either.

Saturday, October 22, 2011
The Rotisserie Rolls On
I finally got a minute to get the round tube steel I needed for the pivots for the rotisserie. There's a nice little remnants shop next to the Metal Supermarkets store. It's a little out of the way, but easy to find. They had all kinds of odds and ends in there, all pretty darn cheap.
Here are the components for the pivots. There's an outside sleeve, an inside pin, and a couple of retaining rings. The inside ring will be welded on, the outside ring will get drilled and tapped for a retaining bolt.

Here's a picture of my cutting rig. It's pretty tight, especially with the long sticks of square tubing. But the Craftsman chopsaw does pretty good.

I have all the steel I need, except for the mounting brackets. I won't worry about that until I get the uprights closer to completion. I need to get the pivots drilled, a friend with a drill press is going to help me out with that one of these next days. Once that's done, the only other thing I'd need would be the casters. Looks like there might be a great local source for those as well.

The process of cutting the round slots for the pivots was a little tricky. I planned on using a hole saw, and drilling the tops out. That required trimming some extra material off the uprights, but I don't think that will be a serious problem.

I marked and center punched a hole 1/2" from the top, and center. This is where the drill bit on the hole saw went. I only drilled far enough to get just far enough through to do the job. I then trimmed off 1" from the top of both pieces with the chopsaw. That made for a nearly perfect cut. The 3" round stock fits like a glove. I will bevel those edges to improve penetration/holding on the weld.

Having all the pieces precut makes a huge difference in final construction. I welded part of the upright last night, and welded in the inside leg this morning. I have the wheel mounts tacked in, and I expect to have both uprights to this stage before the end of the day. Then all I'd be waiting on is an opportunity to get the pivots drilled so they can be mounted. All in all, this seems to be going together very nicely.
Last night's progress:

Current progress:

Monday, October 17, 2011
More Rotisserie
I have a good part of the steel I need for the rotisserie, and I got all the parts for the uprights/supports measured and cut. I still have to get some round tubing for the swivels/pins, and some of the 2x2 square tubing for the body mount brackets. I already had to weld some of the 3" tube together, because I misjudged my lengths at the store, and came up short on one of the uprights. But I got that settled OK, and I'm pretty satisfied with that weld job.
This thing is going to be so overbuilt, it's not even funny. But that's OK. A little overkill never hurt anything.
Photos of the construction process will follow. I should be able to start tacking the uprights, supports, and wheel mounts together tonight or tomorrow.
So far, the damage on the steel is $365. But that includes a $95 3'x3' plate that I'm using for a construction table, which really should count as a tool/supplies cost, not necessarily a cost toward the restoration. But right now I'm counting everything. I'll keep a tally together. Since buying a new rotisserie of this stoutness would set me back as much as $2,000, I think I have room to move.
Monday, October 10, 2011
Long Time, No See, and a Rotisserie
Well, work has conspired to rob me of valuable car building time, so it's been awhile since I had anything worth updating. Progress has not significantly changed since my last post, except that I did receive the floorpan repair panel from Ricks' Camaro. And I made a decision about the nature of this rebuild.
Compromise is a dirty word. Sometimes you're forced to compromise, and sometimes it works out in your benefit. However, I don't really want to compromise too much on this car. The whole point is to end up with something that is virtually brand-new. So crawling under it to do a hasty overhead job on the floor pan simply will not do.
So I'm going to build a rotisserie, and do this up right. I found this guy's plans and buildup: Rotisserie plans/buildup. I took the list down to MetalMart, because they're open on Saturday and Wasatch Steel is not. Looks like I could be into the materials somewhere around $300. Which is outstanding. Retail, a rotisserie would run me at least a grand. And, if I build this thing right, I can either keep it for the next car project, or turn it around and make a small profit.
I'm going to check Wasatch Steel's prices. If nothing else, I'll buy the long, long sticks from them, as I don't fancy having a 24' piece of 3" square tubing riding on the top of my pathfinder all up and down I-15. Wasatch is just up the road. Also, MetalMart told me they didn't carry the round tube (which seemed funny. . .). So we'll see if I can cut work early one of these next days and do some checking.
It may be a tight fit in the garage, but we'll see. If I have to flip the car 90 degrees, it's no big deal, since this project has totally taken over my garage anyhow.
Tuesday, September 20, 2011
Subframe

The POR-15 is on the subframe. I will top this with a coat of black enamel, as the POR-15 is not UV resistant, and no one wants a bright silver frame.
Coating the inside was a beast. I still need to go over that again. This is accomplished by zip-tieing a small sponge to a thin pole. You dab the sponge in the paint, and run it up and down inside the frame. It's not too tough, but it's hard to hit some spots, and impossible to hit others.
You could make the argument that powdercoating would've offered more coverage, but I have never been impressed with powdercoating. The POR-15 is far more durable.
The best thing about this, is that this is one of the first things that can go in the "build-up" column, versus the "tear-down" column. Very exciting. You need these little things to keep up your motivation.
Monday, September 19, 2011
It's a long road yet. . .

This weekend marked some good progress on the car. I have the interior 90% stripped out, with only the dash/firewall area left to go over. I want to take my time with that.

I did find one more tiny rust spot in the floorboard that will have to be repaired. It's in a really bad spot, up on a 3-way corner of the driver side kick board. I haven't wire-wheeled it to see what the real extent of the rust damage is yet. Not looking forward to that. But I still shouldn't complain. I'm really lucky that the floor wasn't completely rotted out of this car, given the amount of time it spend out in the weather.

I also took the rest of the glass out of the car. Removing the rear quarter windows took a little time to figure out, but was easy once I got a good look at it. I didn't see any reference to this area in the factory assembly manual, so I didn't have much to go on.
The headliner stripped out fairly easily, and from looking at it, I don't think reinstalling the new one will be much trouble. Also, on a very positive note: The roof supports only have some very minor surface rust. I was worried that they'd be completely rotten, too. That's a stroke of really good luck. So as it stands now, I should be able to get away with replacing the roof skin.
One sad note is the area between the rear window and the trunk. Don't know exactly what that's supposed to be called, but it's another common problem area in these cars. It will have to be replaced. But in the scope of things, that should be one of the easier repairs to make.


I also ran into the old lead body filler at the quarter panel/roof seams. I took a quick stab at removing some of the lead, just to see how difficult it will be. It's not hard, but I'll have to take care not to burn the hell out of myself doing it.

Next on the list: I need to get some 1" square tubing to make body supports for the roof replacement. I think instead of reassembling the front end to make the car easier to deal with, I will just move on and try to complete the body work before I do any re-assembly.
I also need to move the car a foot or two away from the back wall of the garage. Haven't quite worked out how to do that yet, but it shouldn't be too difficult. Probably just a matter of getting it on the floor jack and easing it out. Then I can move on to the trunk area, and see what I'm up against there. I'm hoping it will be OK. I've checked on the trunk a few times over the years, and it always looked like it was holding out. But I won't really know until I tear into it.
Found some nice parts I'd stashed away in the interior. A pair of sway bar links that came with the poly bushings I put in the front end. I also have a set of polyurethane ball joint caps. The replacement headliner and door panels, a chrome valve cover for the 250, and a set of replacement mirrors for the doors as well. I believe there are a few more parts stashed in the trunk, but I don't have an exact inventory. Yet.
I also got a coat of POR-15 on the subframe. Really, I should've been completely done with the frame, but for some reason (lack of humidity???) the POR-15 took all day to cure. When I painted my A-arms, it cured in a couple hours. Don't know what's different, but I checked this morning, and it was all cured up. I'll go over it once more probably tomorrow, and that will be all done, ready to go back on the car.
Friday, September 16, 2011
Getting the hang of it, sorta.
OK!
I got the subframe mount repair bits in the other day, and welded one in. I took a bunch of pics, to try and detail the process. It's really not too tough, just takes some time.

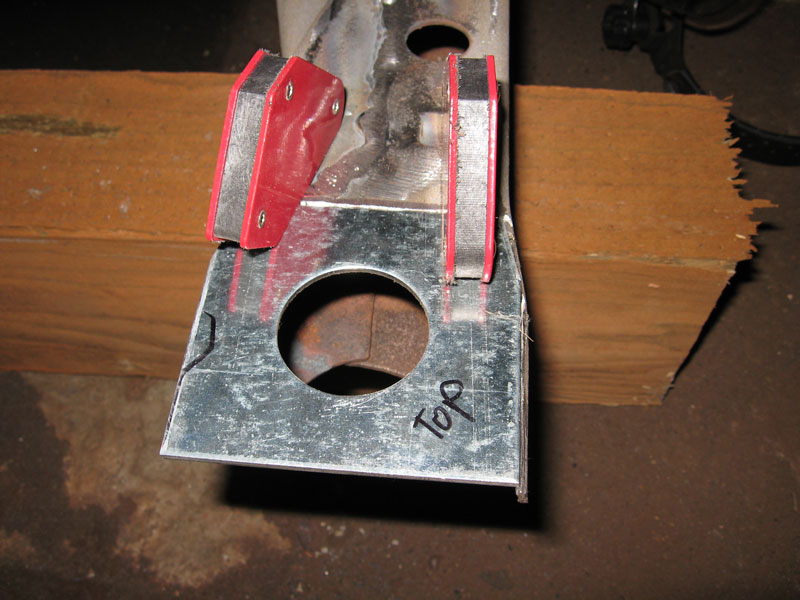
The first thing to do is line up the repair piece. You want some kind of indicator of position. Here, "top" was plenty, as there wasn't too many other ways this thing could go on there. YOu can just barely see I've traced the piece with a black Sharpie. Could just as easily use soapstone, but Sharpies smell better.

There you can see the tracing. You can see how rusted the mount is from here. Not good. The new mounts will be much stronger, and a much tighter fit.

Next, you cut out the old nasty stuff. My cut here isn't too clean on the inside, but I fixed that with a nice flat file I keep around.

Fitting the piece after you cut takes a little time. You want the repair piece to be completely flush with the frame. The magnets help to hold the piece. They're not very strong, but they do OK. I'll probably pick up some stronger magnets in the future. These are nice because they can hold the metal at several different angles. All you need is enough hold to place your tack welds.

Those be the tack welds. I also tacked it on that other outside corner, to make sure the piece doesn't move as the metal tries to contract/expand as it's welded.

Now, despite myself, I almost got a half decent bead going there on the top. I found that moving faster and watching the puddle helped a great deal. It's important to be comfortable, and not to strain. I have an awful tendency to hold the welding gun with a Death Grip, and that's just not necessary. You want to be nice and relaxed, and let things flow instead of forcing them.
You'll note the white/yellow color on the metal. These repair pieces are galvanized steel. You want to take care with galvanized metal, because as you weld and cut and grind it, it gives off some fairly nasty dust and gas. It's advisable to have a well-ventilated area, regardless of what you're welding. There are always fumes, and if you're welding with inert gas, as I am, that stuff is heavier than air, and will collect around the floor. If you're not careful, you can just kinda asphyxiate yourself and never know it.

See that nasty white stuff? I wish they wouldn't send these out galvanized. I'm going to POR-15 the whole frame, anyway. The black streak is where the weld has penetrated through. I have the welder set at 3 on the power, and between 25/30 on the wire feed. And I have the gas set at just under 20 cubic inches/minute.

After some flap-disk fun and games, the repair ends up looking OK. It feels much stronger than the old one, too.
So that's all there is to welding in a replacement piece in that frame. I'm only going to do the same mount on the other side of the frame. I do have replacement pieces for all of it, but the other subframe mounts are good to go.
I got the subframe mount repair bits in the other day, and welded one in. I took a bunch of pics, to try and detail the process. It's really not too tough, just takes some time.

The first thing to do is line up the repair piece. You want some kind of indicator of position. Here, "top" was plenty, as there wasn't too many other ways this thing could go on there. YOu can just barely see I've traced the piece with a black Sharpie. Could just as easily use soapstone, but Sharpies smell better.

There you can see the tracing. You can see how rusted the mount is from here. Not good. The new mounts will be much stronger, and a much tighter fit.
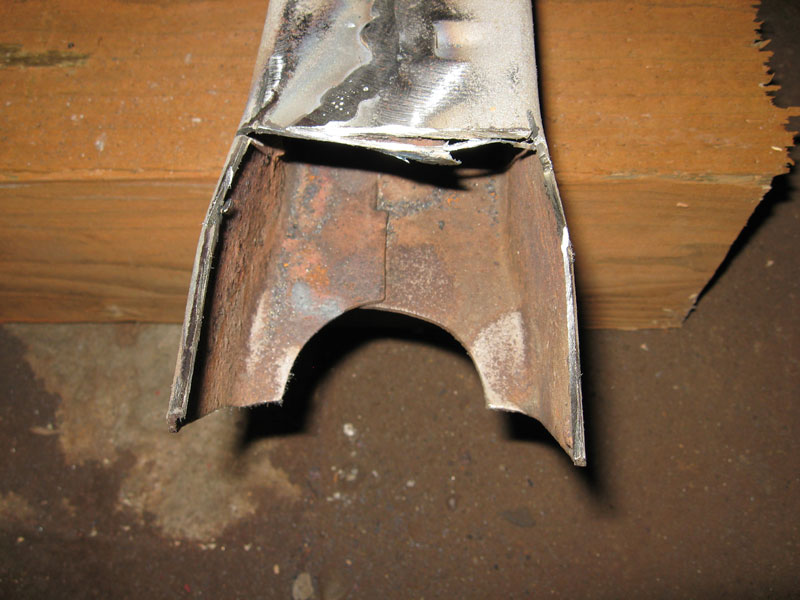
Next, you cut out the old nasty stuff. My cut here isn't too clean on the inside, but I fixed that with a nice flat file I keep around.
Fitting the piece after you cut takes a little time. You want the repair piece to be completely flush with the frame. The magnets help to hold the piece. They're not very strong, but they do OK. I'll probably pick up some stronger magnets in the future. These are nice because they can hold the metal at several different angles. All you need is enough hold to place your tack welds.

Those be the tack welds. I also tacked it on that other outside corner, to make sure the piece doesn't move as the metal tries to contract/expand as it's welded.

Now, despite myself, I almost got a half decent bead going there on the top. I found that moving faster and watching the puddle helped a great deal. It's important to be comfortable, and not to strain. I have an awful tendency to hold the welding gun with a Death Grip, and that's just not necessary. You want to be nice and relaxed, and let things flow instead of forcing them.
You'll note the white/yellow color on the metal. These repair pieces are galvanized steel. You want to take care with galvanized metal, because as you weld and cut and grind it, it gives off some fairly nasty dust and gas. It's advisable to have a well-ventilated area, regardless of what you're welding. There are always fumes, and if you're welding with inert gas, as I am, that stuff is heavier than air, and will collect around the floor. If you're not careful, you can just kinda asphyxiate yourself and never know it.

See that nasty white stuff? I wish they wouldn't send these out galvanized. I'm going to POR-15 the whole frame, anyway. The black streak is where the weld has penetrated through. I have the welder set at 3 on the power, and between 25/30 on the wire feed. And I have the gas set at just under 20 cubic inches/minute.

After some flap-disk fun and games, the repair ends up looking OK. It feels much stronger than the old one, too.
So that's all there is to welding in a replacement piece in that frame. I'm only going to do the same mount on the other side of the frame. I do have replacement pieces for all of it, but the other subframe mounts are good to go.
Floor Pan Blues
Well, I was hoping to skate by on the floor pans, but it turns out a smallish chunk of the right (passenger) side needs to be replaced. I jacked up and blocked the car a little higher, so I could get in there and wire wheel some of the old undercoating and surface rust off.

Here's a pic of the left (driver) side. Looks bad, but it's solid. My guess is that on the right side, someone used the floor drain or rocker as a jacking point, as this area is a little bent up. That's all it took to make room for that nasty tinworm to move in and eat up the steel.

I was only intending to do the areas around the subframe mounts and rockers (that area beneath the door). There was much more damage to the right side than I saw earlier.
The nice thing is that the damage doesn't extend up into the rocker itself, or up into the floorboard of the car. It's localized right at along the edge where the rocker meets the floor pan. So I should only have to replace a single section of the panel.
It's not a bad thing, all in all, except for having to be crawling under the car to cut/fit and weld in a patch panel. It will be good practice for the rear quarters and roof replacement.
Note how I have the car blocked up. I wanted a little extra security, so I used a 6"x8" pressure treated beam held up on some jack stands. This is fine for inspecting the area, and pretty safe for working as well. But when I replace the floor panel, I'll have to do something else.


This is one of those times you wish you could afford a rotisserie. But, I actually have an idea for doing the work on the floor from another online camaro restorer. Looks like he put some heavy-duty stands on the back axle, and then made a brace between the subframe mounts on the cowling. Then he jacked the whole car up with a cherry picker. I may try that out. Or not. It ain't the best idea.
Could see about renting a rotisserie, but I'm not sure there's anyone around who would have one. That might accelerate the process, as I'd have to completely strip the car and mount it up. Have to think on that. I guess I could build one, but my fabrication skills are mediocre at best right now.
Oh, and the garage is MUCH cleaner. I spent some time straightening it up and moving out some trash. It's awful nice to have a clean(er) place to work. I was actually able to walk around the car and find some shit I was looking for the other day. Incredible.
I do need to dump out my toolbox and reorganize it.
The repair panel for the floor is ordered. Should have it in a couple days. I will detail that process as it moves forward.
Things that make you go, "Hmmm"
Got my master chassis fastener set in a few days ago. In a word, it's impressive. And worth every penny.

The box is full of tiny, labeled bags for each smaller subset of fasteners. There are things in there I didn't even know came off the car in the first place! Check it out.

Anyway, I would regard this as a "Must Have" for someone doing a restoration.
I also received the body and radiator support bushings, which await my completing repairs to the subframe, which I'll post part of here in just a minute.
Tuesday, September 6, 2011
Impatience is not a virtue
Well, I thought I had the frame all ready to go, but looks like there's more to do before I can get it painted up. The two rear body mounts are much more rusted than I thought, and they will have to be repaired. Choices are to either fabricate new sections, or order repair parts. I'll probably to a little bit of both. While I'm at it, I will likely take a closer look at the other end as well. I've already welded in some extra support for the center mounts, and they should be fine.
The A-arms are partway done. I need to hit the bottom sides with the POR-15, and then finish coat them.
Pics will follow. In the meantime, here's a wicked cool video of a twin-turbo 68 Camaro on the track.
The A-arms are partway done. I need to hit the bottom sides with the POR-15, and then finish coat them.
Pics will follow. In the meantime, here's a wicked cool video of a twin-turbo 68 Camaro on the track.
Update: Frame repair parts are ordered. Should have them late this week or early next.
Friday, September 2, 2011
Continuing frame and front suspension prep
No pictures this time. But progress has been made. I ordered a set of repair washers for the body mounts on the subframe. They weren't bad enough to really need repair, but I'd rather not have to tear the subframe out of the car again. These pieces weld onto the underside of the mounts, reinforcing them without changing the geometry of the frame. I'll have pics of the process of welding them in.
I've also ordered a master chassis fastener set and body bushings from Rick's Camaros. Total was about $330. But I shouldn't have to buy much of anything more as far as fasteners go. That will allow me to replace ALL of the old nuts and bolts. I just ordered reproduction rubber body bushings--opting out of doing polyurethane this time. I do have all-poly in the suspension. I put all that in a long time ago.
Prep continues on the A-arms. I have one left, then I can get them painted. I'll need to get the disc brake conversion set ordered, springs and shocks. I won't likely buy all that at once, but I'd like to get the chassis rolling again, so I can wheel it out and get going on the back end. In a perfect world, I'd have a shop big enough to just tear the whole thing apart all at once. But I think this will work.
One last thing, I ordered a quart each of the POR-15 Marine Clean, Metal Prep and POR-15 silver. I think that should be enough to finish off the frame and suspension. Hopefully, it will leave me enough to repaint the firewall and do some work underneath the car. The floorpans, etc. . . were so 'clean', that I think it would be counterproductive to strip and recoat them at this point. But I will strip and recoat everything around the body mounts.
I will start making up a list of actual expenses here soon. I'd like to have all that documented. Not from a budgeting standpoint, but as a point of reference for what something like this actually costs.
Monday, August 29, 2011
Don't angle grind your leg, and an Ode to Door Hinges
Angle grinders are not the best choice when exfoliating your shins. Just saying. . .

I read this write-up about the Lexus SC400. This is not a car I have ever given a lot of thought about in the past. I used to think they were boring, pedestrian and slow compared to say a Trans Am of the same era. But after reading that article, and going out and looking a bit, I have to say that Lexus is truly worth a second or third look.
Reference the door hinges. That article goes on about them. And yes, it's pretty silly to be geeked up about a pair of door hinges. But you really do have to see these things to believe them. I have no idea what posessed them to do this, but it's cool.

These hinges weigh about 5 or 6 pounds each. And they were built to withstand the apocalypse. No kidding.
Your usual door hinge is a simple tab and rod affair, with maybe a spring (maybe). If you've ever owned a 70's or 80's era GM coupe (like my old Monte Carlo), then you know that door hinges are just not up to the job in these old cars. I think the doors on that Monte Carlo dropped two inches the minute you pulled the latch.
Now the hinges and doors on my Camaro open and close like brand-new. They just haven't been used enough to have worn out and sagged. But they will. So I'm giving some thought about retro-fitting these Lexus hinges in. Just a thought. There's plenty of room behind the fender for them, and I don't think the fabrication needed would be too tough.
If not, then I'll just keep them and use them somewhere else. I know it's dumb, but it's kinda fun to look at them and think about how someone in this day and age would ever build something indestructible like that. It flies in the face of everything this society is about. And if they built the rest of the car like that, I am going to have to get one.

Now, onto the actual restoration stuff I did this weekend. I received my POR-15 starter kit on Friday, and began prepping one of my A-arms and the transmission crossmember. Prep was easy. I took all the old scale and undercoating off the A-arm with a wire wheel (hence the shin). Then it was just a matter of spraying on the Marine Clean, letting it sit a bit, then rinsing it off. After that, I let it dry, and then applied the metal prep solution which left the piece looking like this:

After that, I just brushed on the POR-15 and let it cure. This stuff is supposed to be pretty tough, and it seems like it. I was careful, and didn't get it all over the place like I usually do with paint. Solvents and strippers won't do much to this stuff once it's cured.

Once the POR-15 was well-cured, I hit the A-arm with a shot of Rustoleum Professional Enamel. We'll see how that holds up. But once it's done, it sure makes those old parts look much, much better.

Just for laughs, the crossmember.

Subscribe to:
Posts (Atom)