Started cutting out the right hand (passenger) side quarter panel. Cutting the spot welds was pretty uneventful, and I've just about got the skin off. I don't know how you could ever get one off clean, because there are a couple of spots you simply cannot get a drill into to cut those welds.
I find myself wondering if anyone out there could use these quarters. Probably not, since they all seem to rot in the same places. But I have seen some custom builders pushing out the rear wheel wells to make the rear end of the car wider--which is actually a pretty cool look, but nothing I'm interested in.
I may post them on the local classifieds, see if there are any takers.
Progress is still painfully slow. Bodywork just isn't my strength, I guess. I'm more of a disassembly guy (LOL).
Monday, November 12, 2012
Friday, October 26, 2012
Stalled
Work on the car has stalled out. I got started drilling out the spot welds on the RH quarter panel last weekend, but didn't get far enough to remove the panel.
It's just been difficult to commit time to the project. This quarter panel should go much faster than the other one, but I gotta get motivated and get moving again. Sure would be nice to start re-assembling the car this spring. . .
It's just been difficult to commit time to the project. This quarter panel should go much faster than the other one, but I gotta get motivated and get moving again. Sure would be nice to start re-assembling the car this spring. . .
Tuesday, October 2, 2012
LH Quarter done!
The left hand quarter panel is welded on solid, and lucky me, when I undid all the clamps and screws, everything stayed exactly where it belonged. Door seems to line up well, as do the window channels.
I still have to fill in the screw holes and grind down the welds, but at least that bastard is on finally.
I have to clean out the garage, and reposition everything for the other quarter (which I still haven't ordered)... The RH job will essentially be identical to the LH job. I'll be replacing the outer wheel well, trunk drop and quarter panel. I expect this side to go much faster.
I'm done making predictions, but every little bit of progress gives me more optimism about having this car done in another year or so.
No pictures this time. There's really nothing new to see.
Sunday, September 2, 2012
More quarter panel progress
Have not had time to work on the car for several weeks. Let's just say I've found a new friend who is not a car, and we've been spending some quality time together.
So today had to be Camaro day. Got a lot of work left to do, and I sure would like to have some kind of rolling chassis by springtime next year. Oh well, it may or may not happen. It's not like I'm on a schedule.
Today I simply worked some more on lining up the panel, closing the gaps, etc. . . The major part of that was stripping the glass, regulator and latching hardware out of the driver's side door, and mounting it back up to the car.

Then it's a matter of minor adjustments to the quarter to make it line up just so with the door. You have to watch the gap between quarter and door, the gap along the bottom of the door, and how the top of the door lines up with the top of that section of the quarter. It actually fits pretty well, but there were a few spots that need some work. Nothing drastic, though.
 Lines up pretty well.
The next problem spot is the rear quarter where it meets up with the section holding the brake lights. There was a significant gap here, but it all pulled together nice, with the help of a couple ratchet tie-down straps.


The other problem areas are going to be the window channel, and a nasty gap by the trunk header panel. Very doable, though.
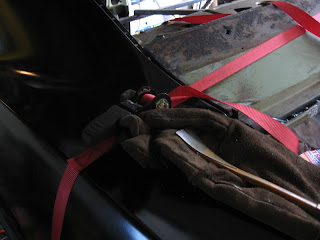
Also, the door is held in with another strap. So far, so good. Once I have it fitted, I'll take it all back apart, seal up my seams, then re-fit and weld the panel permanently. I'm liking how it's starting to look with the new metal.
More to come later!
So today had to be Camaro day. Got a lot of work left to do, and I sure would like to have some kind of rolling chassis by springtime next year. Oh well, it may or may not happen. It's not like I'm on a schedule.
Today I simply worked some more on lining up the panel, closing the gaps, etc. . . The major part of that was stripping the glass, regulator and latching hardware out of the driver's side door, and mounting it back up to the car.

Then it's a matter of minor adjustments to the quarter to make it line up just so with the door. You have to watch the gap between quarter and door, the gap along the bottom of the door, and how the top of the door lines up with the top of that section of the quarter. It actually fits pretty well, but there were a few spots that need some work. Nothing drastic, though.
The next problem spot is the rear quarter where it meets up with the section holding the brake lights. There was a significant gap here, but it all pulled together nice, with the help of a couple ratchet tie-down straps.


The other problem areas are going to be the window channel, and a nasty gap by the trunk header panel. Very doable, though.

Also, the door is held in with another strap. So far, so good. Once I have it fitted, I'll take it all back apart, seal up my seams, then re-fit and weld the panel permanently. I'm liking how it's starting to look with the new metal.
More to come later!
Thursday, August 23, 2012
Broken Record
. . .As in, I'm starting to sound like one.
Progress on the Camaro is minimal. I did start over again fitting the quarter panel, using the front of the wheel well/back of the rocker as a reference point. Should be much closer. I do need to pull the door out of the basement and use it for fitting before I get any further.
On a side note, two new projects have raised their heads. Behold:


Lynn--who, for all intents and purposes, has been my dad since I was something like 7 years old--started doing some work on his two 1965 Chevy C10 pickups. The blue (or green) one was his dads, and the red one he bought brand-spanking new back in the good ol' days. Both trucks need a bunch of work, but they're really solid, and much better than they ought to be having been out in the weather for so long.
He started the blue truck right up. The red one should as well, but we're going to swap out the old points with an Eastwood HEI unit, then give it a try. We're not sure what the motor in the blue truck is, but the red on has a 283. The blue is most likely a 283 as well, but could also be a 265. It's nearly impossible for me to tell. One of these days we'll scrape down to the casting numbers and find out.
Plans are to build stake beds for the trucks, which should be pretty straightforward, and far less expensive than trying to restore the old beds.
So, we're all ass-deep in old Chevys. Which could be worse. We could be ass-deep in MOPARs, and then the only thing we could do is politely shoot ourselves and call it a day.
Tuesday, July 31, 2012
Slowing down
Things have really slowed down with the car. Between work and life, I haven't had much time to devote to the Camaro. Sad, but true.
I have begun fitting the quarter panel, and am busy clamping and screwing in the quarter around the wheel well first. Everything seems to be matching up fairly well, but it's not exactly plug-and-play.
Pictures to follow soon. I'm hoping to have this quarter done in the next week or two, so I can start on the other side. Sure would be nice to begin fitting the roof before snow falls. . .
Thursday, July 5, 2012
Moving along
So, here are some of those pictures from the last couple of days. I have the wheel well and trunk all welded in, and all I need now is a good long afternoon to fit and weld in the quarter panel. I didn't take too many pictures of the welded up panels--it's really not that exciting. But here are some pics of what fitting them in looks like, more or less.

First off, that hole with my finger in it holds the spring for the trunk lid. To line it up, I put a 1/2" drill bit into one side and levered the other into place, then secured it with a self-tapping sheet metal screw. I then moved along the rest of the wheel well, adjusting and adding screws where necessary.
The screws help pull things nice and tight for welding, and generally make life MUCH easier when fitting panels. But you have to be careful, because you can make yourself a mess if you don't watch it.

This is one of the more important structural elements, the roof support is welded directly to the outside wheel well. You can see here I've got it screwed in tight, and ready for welding.
The gray stuff is weld-through primer, which as far as I can tell is just really zinc-heavy spray paint. The heat of the weld melts it, and it flows back into the welded area as it cools. It seems a little backwards, because you have to sand the primer off the seams on the panels, and then paint them with weld-through primer. But it's a very important detail. The primer provides extra protection from rust in the places where you simply cannot paint--inside the welded seam.
I am also going to hit all of these seams with a good seam sealer before I fit and weld the quarter panel in place. Taking some extra steps to kill and prevent all that rust should extend the life of the car indefinitely.

You can see I have a little bit of a nasty gap where the rocker meets the wheel well. I'll patch this in, and weld it up nice and strong. I'm not worried about how pretty it is, just it's structural strength, since all of this will be covered up.

What it looks like after welding. I've also hit this with a wire brush really quick to clean it up. I'll actually brush it good before I apply the seam sealer. Down towards the bottom you can see one of the holes from the sheet metal screws. After I've welded everything in, I go back and undo the screws, then weld in the holes to fill them.
So now all I have to to is fit that quarter panel, and get it welded in.
Even though it's been a month, I've only been able to work on the car a couple days, so there's really not that much work represented here. I estimate that if a fellow was really serious, this whole quarter panel process could be done in 3 or four days. Faster in a professional shop with all the goodies.
Monday, July 2, 2012
Cripes!
I didn't realize it's been a month since that last post. It's been extremely difficult to get anything done on the car for a couple weeks.
I do have the trunk drop and wheel well welded in, I'll have pictures later today. All I need to do now is get the door on, fit that quarter panel and get it welded in. We have the 4th off, which is Wednesday, and I think I'm going to get up early and try to wrap the LH side of the car up.
Which means I'll have to go ahead and order the RH quarter and wheel well. But the only thing left after that is the roof.
I'm getting there. Slowly, but getting there. . .
Sunday, June 3, 2012
Trunk Drops 2
Trunk drops arrived yesterday afternoon via FedEx. I slept in a couple hours today, and then got out there and did some work.
I re-welded all of the spot welds I'd cut unnecessarily, welded in the patch in the wheel well, and did some general cleanup. I then re-fitted the outside wheel house, and fitted the new trunk drop. After temporarily placing the quarter panel on to check fit, it all looked like it would line up just fine. I've got the trunk drop set with a couple of sheet metal screws, and the wheel house is clamped in good and tight.
I should have the two welded in solid by the end of the week. Maybe if Saturday turns out to be a good day, I'll have that quarter panel fitted and welded as well.
I picked up a gun and cartridge of 3M 8115 Panel Bond. I'm going to use that in conjunction with the welding to fix these panels. It will also serve as a seam sealer. I was going to use body caulk, but the 3M rep said that this stuff should be fine for that. I'd rather use a single product, for simplicity's sake if nothing else.
Here's a picture all clamped up. You can also see the parts I've coated with POR-15. My shop is an unholy mess. It's got to the point I can hardly use it. Time to do some housecleaning!!!

Tuesday, May 29, 2012
Trunk floor extensions
Just ordered the trunk floor extensions from Auto Metal Direct. I gotta say, so far these guys are a pleasure to work with. If you're at all interested in quality and service, I'd say you couldn't go wrong with these folks.
Monday, May 28, 2012
Patches
I took a small amount of time this weekend and worked on some patches. One is the critical patch to the inside left wheel house/rocker, and I cut two more very small patches for the dash panel.
The hole I have to plug in the wheel well is ugly:

But once the patch is in place, all will be well with the world:

The holes are for plug welds, much like those I did for the floor. I did have a chance to try out my new punch/flange tool, and punched the holes on the top of the patch, and even put in a light flange in the backing (you can see it in the top photo). It works well, but the reach for the punch tool is limited. The holes, as before, are for plug welds, except for a coupe of holes where I have some sheet metal screws for positioning the patch. That trick works pretty darn well.
I could go ahead and weld in the patch now, but I need to do some rust treatment inside the rocker. Once that's done, I should have the trunk drop, and I can seriously tackle getting this side of the car finished up.
On the dash panel, there are a couple more small areas of concern. At this point, it might be better to replace the whole dash panel, but I'd hate to have to do that. This should work out OK.

The gray is the weld-through primer. A few weeks earlier, I had done some rust treatment up in here. Let's hope it will be enough.
I am going to have to order the trunk drop for the left hand side. Probably for the right, too. Unless some kind of miracle happens, and I figure out a way to get the quarter panel and wheelhouse fixed without moving it. Not likely!
Friday, May 25, 2012
'68 Camaro Restoration: Wherever you see black paint there is rusted metal...
Found another resto-camaro-blogger out there: '68 Camaro Restoration: Wherever you see black paint there is rusted metal...:
Nice to know I'm not alone out here. . .
Nice to know I'm not alone out here. . .
Saturday, May 19, 2012
Left Hand Outside Wheel House
Well, after some deliberation I decided it was worth the effort to get the remainder of the outside wheelhouse out from between the other two panels. This was sort of a bitch.
I ended up taking a hint from some YouTube posters, and picked up a cheap air hammer. I guess they're the cat's meow when it comes to breaking panels apart.
Well, yes and no.
It worked really well in some spots, and didn't work worth a damn in others. And, as with any power tool, you can do a lot more damage in a lot less time. I'll have to do some repairing, but in the long run, it will be for the best. And hopefully, I'll do a better job on the other side. I can see how the air hammer can be a great asset--I just need more practice.
I began fitting the inside wheel well. It's going to be a bit tricky, because I'll have to fit it and the quarter panel at the same time, more or less. But then I can clamp the wheelhouse in place and take the quarter off for welding.


I still need a punch tool. Trying to decide to get a hand punch, or a punch/flange tool. I'll probably just get the punch/flange tool, since I can use it for other stuff down the line.
One thing I think I've forgotten to note is that I also have to repair the rocker where it meets the wheel well. This should be a simple patch job, as all I've got to do is box off the end and blend everything in properly. I will likely get in there and do some rust treatment on the inside of the rocker while it's open.
So, it shouldn't be more than another week or two before I have this side back together.
OH, one more note, I think I will go ahead and replace the trunk drop while I'm at it. Might as well. The old one is usable, but it looks pretty bad, and my hammer/dolly work simply isn't up to it.
Thursday, May 10, 2012
More Quarter Panel Prep
I'm continuing with the preparation for the new left quarter panel. I have most of the old metal removed, with the exception of a couple tough spots. I have a couple of pictures. First up, is near the roof, where I have the spot welds cut and sanded down smooth.

You can see where I've cut some of the roof out to make room to work. The roof skin overlaps the quarter panels, so I have to have it out of the way right now. Doesn't really matter, because the whole roof skin has to be replaced anyway. As long as I don't disturb the structure of the unit-body, I'm OK.
Next up, I'll show you some problem areas. The window frame is kind of a bitch. I really don't want to screw it up, or the glass won't fit back into the hole! You can see where there's a stubborn piece still hanging on. I will likely remove that carefully using a roloc sanding disk and die grinder.

You can also see some bending and warping of that lip. I'll fix that with some hammer and dolly action. Shouldn't be a big deal.
Now, the other problem area is a real tight spot on the rear panel. I'm not 100% sure how I'll handle this, but it will probably take a small grinding stone in a rotary tool to get in there without dicking up the good panels. Tricky, but do-able.

I wanted to share pictures of the tools I've been using to cut the spot welds. For most of the work I've done so far, I've been using this Harbor Freight spot weld cutter. It actually works pretty well. However, it doesn't take long for that center pin to start to wobble, which makes cutting a certifiable bitch. On the plus side, when you wear one set of teeth out, you can reverse the cutter and keep on going.

I got tired of the wobbling, which was getting to the point that I would've been better off with a grinding wheel. So, I asked the body supply place down the street if they had any good tools. They did. I decided to try this little beauty:

This is a sort of stubby 8mm brad-point bit. Why metric? I have no friggin' idea. But it's easier to steer, cuts a hair faster and doesn't wobble a bit. The bit is also 2-sided, so you can flip it once one side is dulled.
Bad part? The new bit is $22. The Harbor Freight cutter is $5. But if it makes my job easier, then it's worth it. I'm finding that some cheaper "short cuts" just aren't worth the headache.
So, I probably have another weekend's worth of work before I can start fitting that quarter panel and wheel house. But I'm pretty happy with how this is moving along.
I will be picking up a pneumatic punch/flange tool as soon as I have this prep work done. That's going to pay for itself on these quarter panels and wheel houses.
One other quick note: I have started looking into those Lord body adhesives. I keep hearing really good things about them, and I may try to incorporate them on some of the more difficult sections of the quarters. I need to do some more reading and shopping around, but it sounds like the new stuff is as strong or stronger than welding. Sounds silly, but there's some good evidence out there.
I also ran into "Mag Daddy", who make these very interesting fasteners. I apologize for the horrible music after the link. Don't they tell web designers these days not to do that anymore???
I'm particularly interested in the glue-in fasteners for door panels and such. Door panels are such an uholy bitch. I've never been able to do anything but wreck them, even being super careful. The mag daddy's look like a great alternative.
Monday, May 7, 2012
Auto Metal Direct is Blistering Fast
Well, I'm sick as a dog today. I think the phrase is, "I feel like hammered dogshit". I've just been sitting in the house being miserable all day. I watched "13 Assassins," which is possibly the coolest samurai movie in existence. Then I played God of War and nursed some pomegranate juice. Meh.
Tomorrow, it's back to work. Hammered shit or no.
I had to jump on and post, because Auto Metal Direct got me my parts already. I figured I had at least 3 weeks to work on trimming out the rest of the old quarter panel, and get everything cleaned up for the new one. But Sala freight delivered the parts to me today.
The metal looks great. I haven't tried test-fitting, but they definitely did not skimp on the metal. It's an obviously heavier gauge than the Rick's Camaro floor pan patch.
So if it all fits, I think Auto Metal Direct may have a new customer. It will still be a week or two before I'm ready to weld the new panel in. List:
It's going to be sooooo awesome, I can't stand it!!!
Pictures to follow, probably later in the week when I start feeling better.
Tomorrow, it's back to work. Hammered shit or no.
I had to jump on and post, because Auto Metal Direct got me my parts already. I figured I had at least 3 weeks to work on trimming out the rest of the old quarter panel, and get everything cleaned up for the new one. But Sala freight delivered the parts to me today.
The metal looks great. I haven't tried test-fitting, but they definitely did not skimp on the metal. It's an obviously heavier gauge than the Rick's Camaro floor pan patch.
So if it all fits, I think Auto Metal Direct may have a new customer. It will still be a week or two before I'm ready to weld the new panel in. List:
- Cut all old spot-welds, and remove the old metal (I'm about halfway on this chore)
- Sand down the humps from the spot-welds
- Prep and paint the interior of the panels
It's going to be sooooo awesome, I can't stand it!!!
Pictures to follow, probably later in the week when I start feeling better.
Monday, April 30, 2012
Ordered new quarter and wheel house
I've placed the order for the new quarter panel from Auto Metal Direct. The cost was significantly higher than I would've paid from Rick's Camaro or Classic Industries, but I believe I'll be getting a much better part in the end. This quarter is supposed to be the original gauge metal, and they claim that they've done extensive fitting and development of the parts. We shall see.
One complaint I have of the floor patch panel from Rick's was that it was noticeably lighter than the original steel. It's a fine part, and there's no reason to redo the repair, but just something to note.
I think I can repair the inner wheelhouses myself with some simple patching. I'll have a couple weeks to wait for the new parts, which should be plenty of time to clean and prep, and make that repair. If this works out, then cost to repair the quarters will be a hair over $1200. Which still leaves the roof. Expensive! But still cheaper than farming it out.
Saturday, April 28, 2012
Quarter panel, continued
There's just nothing as spooky as taking a cutting wheel to perfectly good sheet metal. I've put this off for days now, and when it came down to do it, I had to stand there and think about it.
I did finally get to cutting. But there were a few steps to complete before busting out the die grinder.
First, the old lead filler has to be removed from the seam where the sail panel meets the roof. This isn't too bad, but you have to watch yourself, because molten lead will burn the shit out of you. I took my time, only melting a short bit at a time. If you do it slow, the lead cools and sticks, and never runs off to drop down the side of your shoe.


After that, you cut spot welds until your head aches and you want to die.

You'll notice I cut all the way through on a bunch of these. That's a no-no, but I'm still trying to get the hang of all this.
I then welded in another small support for the trunk. There's a band of steel that holds the weatherstripping. I tacked it in place, secured to the trunk floor, with a piece of 3/4" square tubing.

Then I cut. I don't have pictures of the cut in progress, but it was emotional. Nothing on this car has freaked me out as much as this.
After cutting out the panel, I found that things really didn't look too bad up under there. The wheelhouse isn't nearly in as bad a shape as I had thought. I may be able to patch the thing up, and leave 90% of the original in place. I hope that works out.
There's a thin patina of rust all over everything, but it's more like a light dusting than anything else. I didn't find any new rot under there. Not even the trunk drop-off. And usually that's one of the worst places on these cars. And I thought I had all the hornets nests out, but lookie there. . .


So now, no more excuses. I'll be ordering the replacement quarter and wheel house ASAP. In the meantime, there's a lot of cleanup and prep that has to happen.
Monday, April 23, 2012
Quarter Panel Replacement
Well, I could've stayed inside and played God of War 2, but that seemed like a terrible waste. So I rearranged the garage real quick, and got to welding in some temporary body supports.


Before welding in the supports, I leveled the body (you can see the carpenter's level on the package tray), and tack-welded the rotisserie in place.
The role of these supports is to strengthen the body while you remove the quarter panels. I know a lot of restorers think it's the kiss of death to do the quarters on a rotisserie, but I think it should be OK. I have a few extra things going my way.
The rotisserie is connected to the subframe mounts, and the leaf spring mounts. I just don't see how that can present any more of a load on the body. Again, I could be totally wrong. We shall see.
So now I got no excuse. I'll order the left-hand quarter and wheelhouse tomorrow. I'm going to give Classic industries a whirl, and see how their panels stack up to that floor panel I got from Ricks' Camaro.
I'll also go pick up some more 1" square tubing and weld in two more angle braces in there. May not help that much, but it sure won't hurt, either.


Before welding in the supports, I leveled the body (you can see the carpenter's level on the package tray), and tack-welded the rotisserie in place.
The role of these supports is to strengthen the body while you remove the quarter panels. I know a lot of restorers think it's the kiss of death to do the quarters on a rotisserie, but I think it should be OK. I have a few extra things going my way.
- I'll only do one quarter at a time.
- I don't have to remove the back panel
- I'm going to brace the hell out of it.
The rotisserie is connected to the subframe mounts, and the leaf spring mounts. I just don't see how that can present any more of a load on the body. Again, I could be totally wrong. We shall see.
So now I got no excuse. I'll order the left-hand quarter and wheelhouse tomorrow. I'm going to give Classic industries a whirl, and see how their panels stack up to that floor panel I got from Ricks' Camaro.
I'll also go pick up some more 1" square tubing and weld in two more angle braces in there. May not help that much, but it sure won't hurt, either.
Bumper!
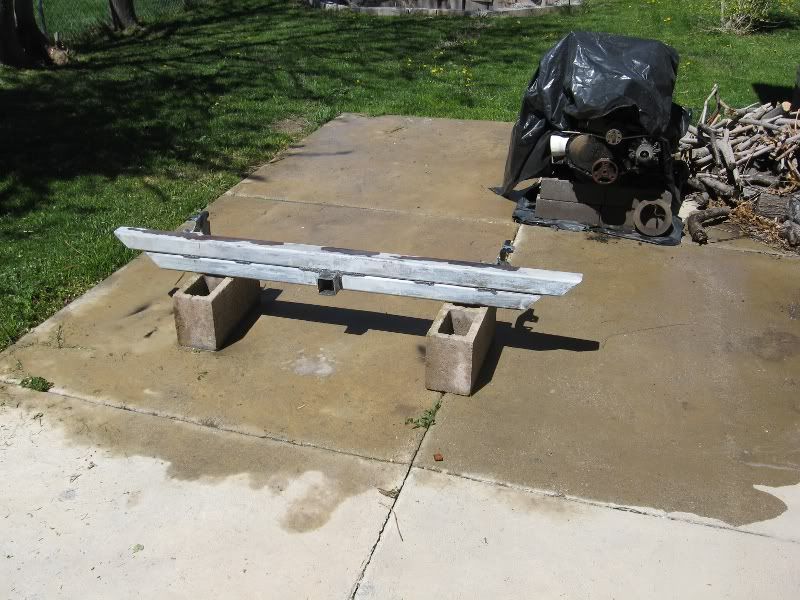
OK, no Camaro work this last weekend. I had to make a bumper for my Pathfinder, because the original one had pretty much rusted through, and was going to fall clear off.
You can see the tinworm has done its evil work on that frame. I hate to even think of what else is rusting away under there. . .
I simply re-used the stock brackets, with a piece of angle iron.
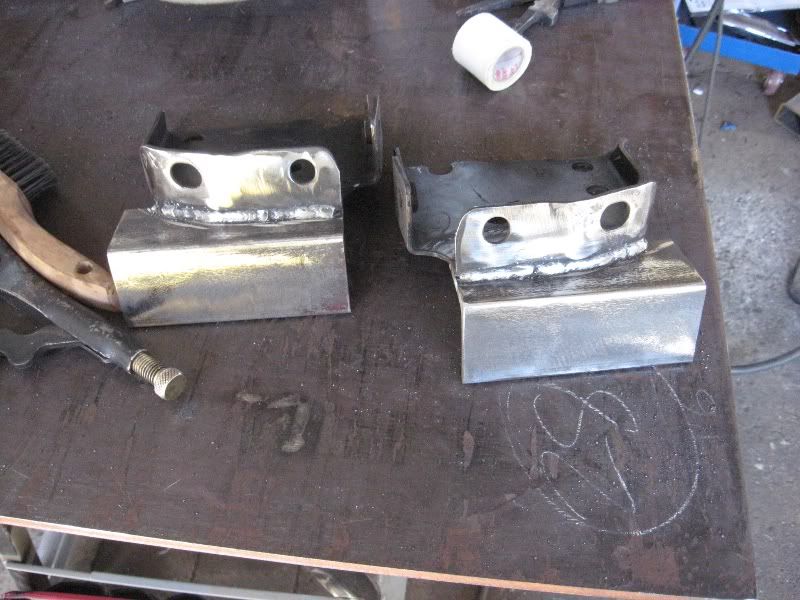
Here are the brackets, all fabbed up, and ready to go.
I treated the finished product with etch & prep, and painted with rustoleum enamel. Not fancy, but should be well protected.
It leaves kind of a big empty spot, but it's heavy and rugged as hell. Heaven help the person who rear-ends me now.
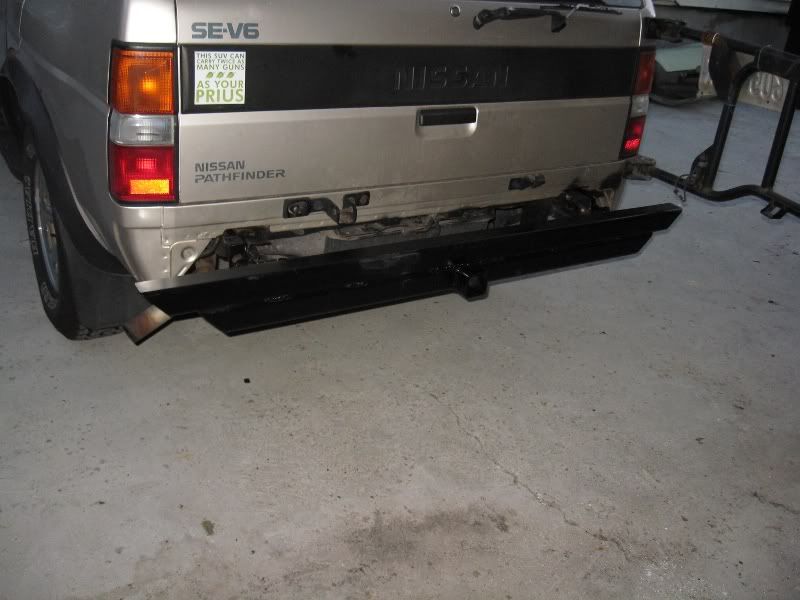
And, a close-up of that fabulous sticker. . .

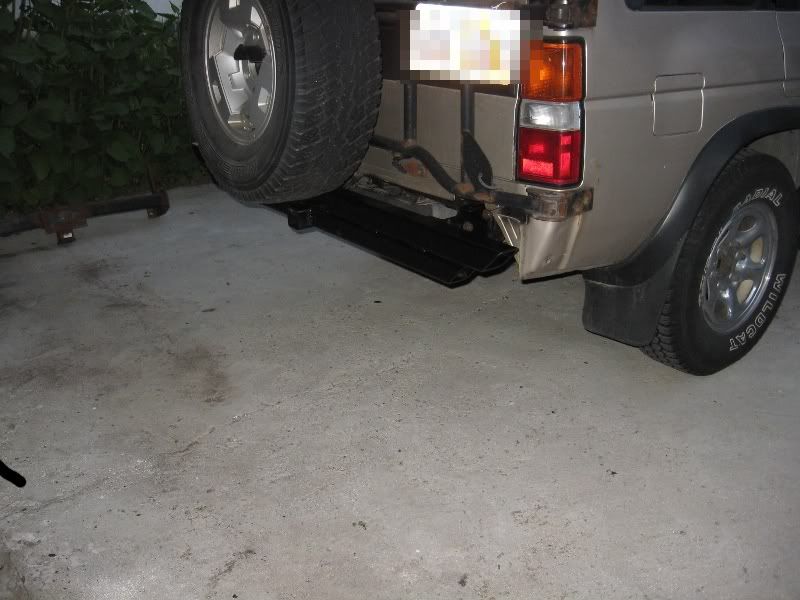
I also had to move the spare tire carrier up about 3", but that was easy.
You can see the tinworm has done its evil work on that frame. I hate to even think of what else is rusting away under there. . .
I simply re-used the stock brackets, with a piece of angle iron.
Here are the brackets, all fabbed up, and ready to go.
I treated the finished product with etch & prep, and painted with rustoleum enamel. Not fancy, but should be well protected.
It leaves kind of a big empty spot, but it's heavy and rugged as hell. Heaven help the person who rear-ends me now.
And, a close-up of that fabulous sticker. . .
I also had to move the spare tire carrier up about 3", but that was easy.
Thursday, April 19, 2012
Undercoating REALLY Sucks
Sorry for the lack of recent postings. I have just been working on stripping all that old undercoating, and it's really not much fun.
Scraping worked really well for the big stuff, now I'm down to the nooks and crannies. I finally said screw it and hit it with a wire wheel. Once you're down to the smaller spots, the wire wheel is great. Just noisy and tedious. I'm sure the neighbors hate me right now.
Still haven't found anything chemical that will touch that undercoat. It's nasty stuff. I think I'll order a can of the Eastwood undercoating stripper and see if that works. I'm doubtful, but I'd resort to just about anything short of a blowtorch at this point. Aircraft stripper doesn't touch it, and neither does oven cleaner. The most I can notice with both is that it sort of dries out the undercoating, making the top layer marginally easier to strip off with a wheel.
I also picked up one of those small sandblaster guns at Harbor Freight and some glass bead media. It actually works pretty well. But I'm finding that I didn't buy nearly enough air compressor for the job. One of my new missions is to find some kind of 25 to 30 gallon pressure vessel (like a water heater tank) that I can retrofit into a supplementary tank. Not sure how that will go, but if it's a big expensive hassle, I may just try to sell this compressor and pick up a bigger one. So word to the wise: If it seems like it might be big enough, buy one twice that size.
Pics to follow this weekend, I hope. I will probably try to get some internal bracing welded in for the quarter panel swaps. I'm seeing a lot of people say, "don't do that on the rotisserie", which makes no sense whatsoever to me. Supposedly the body is under a different torque load on the rotisserie, which may be true. But you can't tell me that there's more torque on the body when you've eliminated about 6 feet of subframe. I could be dead wrong, but I'm going to go ahead and do the quarters, one at a time, on the rotisserie. We'll see.
Monday, April 2, 2012
Brake calipers, and Undercoating Sucks
Got the brake calipers cleaned up, but they still need a rust conversion treatment and some paint. Once painted, they'll look nice and shiny and brand stinking new.

This first picture you can see the nice plastic and rubber bands I used to seal off the bleed screws and the brake line fitting. The fitting will be replaced, but you don't want any water getting inside that brake caliper.

This next picture you can see the calipers drying. they fit perfectly on the lip of the gigantic steel deep sink in my basement. That sink is probably one of the coolest things about this house. At this moment, the calipers are still there, waiting for me to get off my butt and get them painted. I need to mask off the piston seals before I hit them with the Metal Prep. I also found a similar Rustoleum conversion/etch product that I may test on these, just to see how well it works. I may just get some liquid mask, and use that to protect everything during treatment and painting. I thought about Vaseline, but that just sounds messy.

That all happened about two weeks ago. This weekend, I spent the whole day Saturday under the car scraping off the old asphalt-based undercoating. That stuff is truly evil. I've tried multiple ways of getting it off. No solvent seems capable of removing it, although aircraft stripper does seem to eat on it a little bit. A wire wheel will remove it, but it melts and spatters, and almost makes more of a mess than it's worth. So I grabbed a paint scraper, and Lo and Behold, it scrapes right off. There are some tight places that will have to be hit with a wire wheel, but for the most part, scraping seems to be the most effective. In the pictuer above, you can see the black areas where the undercoating hasn't come off, versus the lighter areas where it has. I have a thin coat of aircraft stripper on there to help remove the light stuff left from scraping.

This is another good shot of the before and after. The dark stuff is where I haven't hit it yet. You can see some nice little rust spots under there, too. But I haven't found any really nasty surprises yet (knock on wood).
I have it just over halfway done, as far as scraping goes. I'll still have to clean it down to the paint/metal, rough the surface up, and then get it treated and coated with Metal Prep and POR-15, followed by a coat of black Rustoleum to give the POR-15 some UV protection. Similar to how I prepped the subframe.

Here's another quick shot of the repaired floor area. I still have some major cleanup to do here, but it's good for now. I want to get all that undercoating off before I do much more there. I still need to grind those welds flush, fill any pinholes, and then apply some Duraglas filler and prep for paint. But that will probably mostly have to wait until I have the quarter panels done.

Speaking of which, after some cleanup, on the Left side, I did discover that I'll have to replace both the inner and outer wheelhouse--maybe. It's possible that I could repair the inner wheelhouse. I'll have to get the quarter off to know for sure.

That's the next phase of the project, then. Removal and replacement of the driver's side quarter. But that won't happen until I'm done with this awful undercoating chore.
Thursday, March 29, 2012
Floor
I have the floor welded in, and the gap filled. There are some small pinholes and things to correct--mostly places where my spot welds didn't join up too well. Nothing that a few zaps with the Hobart won't fix.
The tough part is going to be finishing work. I've started grinding everything down, making the seam as invisible as I possibly can without wrecking the repair.
I picked up a small DeWalt air compressor, a D55168. It had an overwhelming number of positive reviews, and seems like it should be enough to do what I need. It is a little bit lightweight for constant use of a die grinder--I've found that it has to work a little to keep up. It's rated at 5 cfm at 90 psi, which is more than enough for the die grinder I picked up. I haven't picked up an impact wrench yet, but that will be my next tool purchase, I believe. A half-inch impact wrench would do me wonders.
It's very nice to have some compressed air for cleaning things up, too. I will have to see if a small sand/soda blaster will work with this compressor. I may want to get one of those in the near future.
The next major hurdle is going to be the quarter panel replacement. I still haven't ordered the replacement panels, but that's just a matter of jumping online and placing the order. I think I'll get the quarters from Classic Industries. I don't have any real complaints of Rick's Camaro, I just want to see if Classic's are any better. Supposedly the ones from them are "factory approved", which could end up meaning diddly squat. There's no significant price difference.
Before moving to the quarters, I am going to try and do a major cleanup of all the old asphalt-based undercoating. It's a real bear. Oven cleaner doesn't touch it--and I've tried both hot and cold formulas. Aircraft stripper has a visible effect, but it's very minor. I think what I'll have to do is wire-wheel as much of the heavy stuff off as I can, and then go over it with aircraft stripper to finish up with. That undercoating is nasty.
At very least, I have to clean out the wheel wells. Part of the quarter panel replacement will be replacing the outer wheel houses. The inner ones look OK, but I'll have to have it all cleaned up and apart to know if they're truly good-to-go.
Wednesday, March 21, 2012
On the Nature of Rear Ends
The reason that the limited-slip differential I scored at the junkard wouldn't work is complex. . .
For the benefit of potential non-car-person readers, I'd like to explain. If nothing else, this is a good exercise in remembering this stuff. Anyhoo. . . With these F-bodies, you'll run into two main types of rear axle assemblies: The 10-bolt, and the 12-bolt. There are quite a few subdivisions of those two types.
12-bolts are generally stronger, and preferred for cars with more horsepower than sense. I believe that the early Z-28's had 12-bolts, and probably some (but not all) of the SS models would've had them too. Certainly all the big-block Camaros would've had them. 12-bolts are getting pretty hard to come by in the junkyard, I guess. I've never bothered looking for one. I'm not going to get into 12-bolts, because I simply know less than nothing about them. I do know that a brand-new one can cost as much as $2,000. Which is a little stupid, if you ask me.
There are two kinds of 10-bolts, one with an 8.5" carrier, and one with an 8.2" carrier. My understanding is the 8.5" carrier is the next best thing to a 12-bolt. And can be built up pretty respectable.
NOTE: You want to know the basic difference between a Chevy 12 and a 10 bolt? count the number of bolts on the back of the pumpkin. It's just that easy.
My 10-bolt is the 8.2". Of course, the poor little thing had almost the smallest available engine (the 235 was smaller, but just). So there's really no need for a bulletproof rear axle setup.
Now the funny part. In the 3rd Generation F-bodies (1983-1993), there was born the 7.5" 10-bolt. Which is why that limited-slip differential wouldn't work in my rear end. It's just too small. They also gave birth to a 9-bolt rear end. But since that's plainly odd-number blasphemy, we won't even acknowledge its existence.
Of course, this is a super-dumbed down version of the real story. In reality, General Motors created a bewildering amount of variety in these old parts. Back in the day, the way you bought a car was by going through a big hairy form, and checking all the boxes of the stuff you wanted on the car. They were customized in a way that simply isn't done anymore. These days you get one or two choices of package groups, and very few real options.
What that means is that there are literally thousands of variations in the old stuff. And they can be very subtle.
More importantly, what am I going to do with the rear axle in my car? Probably nothing. If I could find a limited-slip that would work, for cheap, I'd grab it up. But I'm not about to dump down $500 for a new differential. Not yet, anyhow. I'll continue to troll the junkyards. If I get lucky and find a positraction 12-bolt, I'll be snatching that thing up. But I ain't holding my breath.
If I do end up swapping in a late-model 4200 Vortec--which is sincerely the route I'd like to go--then I would likely have to upgrade that rear axle to handle the extra power.
It's pretty interesting. There were 8 different factory engines available for the Camaro in the '68 model year:
L26 230cid 140hp
L22 250cid 160hp
LF7 327cid 210hp
L30 327cid 275hp
L48 350cid 295hp
L35 396cid 325hp
L78/79 396cid 375hp
Z28 302cid 290hp
You can see, my 250 is nearly at the bottom of the heap. However, if I were to swap with a 2006-2009 LL8 (the 4200 Vortec), it's about 254 cubic inches, which is super close to mine. But those engines are conservatively rated around 300 horsepower. Which would put me performance-wise right between the 350 and big-block 396. AND solidly drop me into the 25 to 30 mpg range, which no stock first-gen F-body can touch. Not even the wheezy L26.
Getting 300 horsepower out of my L22 is certainly possible, but would end up being far more expensive and time consuming than the 4200 swap (at least by my estimates) Plus, it would still never touch that fuel economy.
Want another funny bit of trivia? A 2012 V-6 Toyota Camry is rated at 268 horsepower. Not much down from the top of the heap 396 in '68. Except that the 396 probably never got more than 8 or 10 miles per gallon.
More Floor
The floor repair goes well. I have created much more work for myself than necessary, but I'll chalk it up to needed training.
Here's a couple pics of the progress. You can see I still have much to do, but it's coming along.


Another part of this process is removing the old asphalt-based undercoating. My intention is to recoat the underside with something prettier, more durable and easier to work with. Removal of this stuff is a certifiable bitch.

Here you can see some of the mess. I've sprayed a liberal layer of Easy Off cold oven cleaner, which does have some small effect on the undercoating. Aircraft stripper works OK, but is far more expensive. I've also resorted to heating a scraper with a propane torch and melting the stuff off. You have to be careful doing that, because the undercoating is dramatically flammable.
Subscribe to:
Comments (Atom)