Well, the good news is that the mounting brackets for those 3rd Gen. brakes work perfectly. I may have to do some spacing to accommodate the rotors, but so far so good.
Bad news is that there's no way that posi 3rd member will work. Crap.
Gooder news is, even with the money wasted on that, I'm WAAAAAY ahead on those rear brakes!
Saturday, March 17, 2012


Gear Oil Stink
Man, does gear oil ever stink! And it WONT wash out. Period.
And I happen to be covered from head to toe in it right this instant. . .
I made it out to the local Pick N Pull to do some minor operating on a 1984 Pontiac Trans Am. Spent most of the morning there wrestling with my own idiocy and impatience. Did it pay off? That's the question.
According to Jeff Smith in the April Car Craft, it's a simple bolt-on procedure to retrofit 3rd Generation F-body rear disc brakes onto first-generation 10-Bolt rear ends. My Camaro has the 10-Bolt rear, and as far as I can tell, those Trans Am brackets do indeed look like they'll fit.
Here's a pic of the brake calipers. Very simple. They might look ugly and rusty, but once I got them off and looked at them, the pistons and seals look brand new. Some elbow grease and POR-15 will have these beauties looking brand stinking new.

Next is a picture of the bracket/backing plates. While this doesn't match exactly what Jeff had in his article, but it's close enough for me. He preferred the smaller iron bracket. I actually like this better, since the splashguard/backing plate is right there. Should look pretty nice under that Camaro when they're all painted up.

I haven't picked up rotors or pads. That will come later. These should take a stock 11.5" rotor. If this swap works out OK, it will effectively save me around $500. So if that savings pans out, I'll spend the extra money on good slotted/drilled rotors all around, and a higher-end swap kit for the front. I will also need to pick up an adjustable proportioning valve to dial in the rear brakes so I don't kill myself or the car.
Without adjustment, the rear brakes can lock up prematurely, which is exactly like yanking on the e-brake lever in your mom's car. The rear end will immediately trade places with the front. I will say that can be fun in the right context, but if you're not expecting it, you will die.
So, big picture thinking: My thought is that with the poly bushings, a Hotchkis TVS suspension, and top-end disc brakes on all fours, this poor ol' six-banger Camaro will handle significantly better than a stock Z-28. I guess we'll see. . .
The very last thing for today is kind of a long-shot I took while under that Trans Am. It had a limited-slip differential in that 10-bolt rear end. For you non-car people, a limited-slip differential makes sure power is evenly delivered to both rear wheels. This effectively gives you more traction, and better control in hard cornering.

So, I pulled the limited-slip 3rd Member out of that Trans Am. I'm going to see if there's a way it can go in my bone-stock 10-inch rear. It's probably a waste of time, but it seems to me like it should be do-able.
And I happen to be covered from head to toe in it right this instant. . .
I made it out to the local Pick N Pull to do some minor operating on a 1984 Pontiac Trans Am. Spent most of the morning there wrestling with my own idiocy and impatience. Did it pay off? That's the question.
According to Jeff Smith in the April Car Craft, it's a simple bolt-on procedure to retrofit 3rd Generation F-body rear disc brakes onto first-generation 10-Bolt rear ends. My Camaro has the 10-Bolt rear, and as far as I can tell, those Trans Am brackets do indeed look like they'll fit.
Here's a pic of the brake calipers. Very simple. They might look ugly and rusty, but once I got them off and looked at them, the pistons and seals look brand new. Some elbow grease and POR-15 will have these beauties looking brand stinking new.

Next is a picture of the bracket/backing plates. While this doesn't match exactly what Jeff had in his article, but it's close enough for me. He preferred the smaller iron bracket. I actually like this better, since the splashguard/backing plate is right there. Should look pretty nice under that Camaro when they're all painted up.

I haven't picked up rotors or pads. That will come later. These should take a stock 11.5" rotor. If this swap works out OK, it will effectively save me around $500. So if that savings pans out, I'll spend the extra money on good slotted/drilled rotors all around, and a higher-end swap kit for the front. I will also need to pick up an adjustable proportioning valve to dial in the rear brakes so I don't kill myself or the car.
Without adjustment, the rear brakes can lock up prematurely, which is exactly like yanking on the e-brake lever in your mom's car. The rear end will immediately trade places with the front. I will say that can be fun in the right context, but if you're not expecting it, you will die.
So, big picture thinking: My thought is that with the poly bushings, a Hotchkis TVS suspension, and top-end disc brakes on all fours, this poor ol' six-banger Camaro will handle significantly better than a stock Z-28. I guess we'll see. . .
The very last thing for today is kind of a long-shot I took while under that Trans Am. It had a limited-slip differential in that 10-bolt rear end. For you non-car people, a limited-slip differential makes sure power is evenly delivered to both rear wheels. This effectively gives you more traction, and better control in hard cornering.

So, I pulled the limited-slip 3rd Member out of that Trans Am. I'm going to see if there's a way it can go in my bone-stock 10-inch rear. It's probably a waste of time, but it seems to me like it should be do-able.
Saturday, March 10, 2012
More Floor
No pics today--nothing worth taking a picture of. I jacked up the car in the rotisserie about 6", and notched out one of the big overkill gussets. This allows me to rotate the car quite a bit more--almost to vertical. Due to the big fenders, I'd have to jack it up almost another foot to clear everything. Which isn't really worth it, since I can get to pretty much everything as-is.
I also filled in the plug welds on the flange of my floor patch, under the car. And I've started to fill that horrible gap left by my incredibly poor cutting skills.
If I really pushed it, I think I could get that bit of floor fairly well done tomorrow. Gonna try.
I also filled in the plug welds on the flange of my floor patch, under the car. And I've started to fill that horrible gap left by my incredibly poor cutting skills.
If I really pushed it, I think I could get that bit of floor fairly well done tomorrow. Gonna try.
Wednesday, March 7, 2012
Unrelated car rant (NSFW)
or Plug-in Hybrids can Suck My Ass
Apologies in advance. If I don't take this chance to rant, I probably won't sleep tonight.
This has nothing to do with restorations, or Camaros. It has more to do with Gen-Y douche-nozzles, marketing, and why it's good that we don't light people on fire anymore. Or at least, we shouldn't light them on fire. . .
I'm reading the April Automobile, going through what's coming up in the wonderful world of cars nobody can afford. Checking out the new stuff from Maserati, Ferrari, Lotus, Aston Martin, etc. . . And in reading, I see three words that should never be used in conjunction with Maserati, Ferrari, Lotus and Aston Martin.
Plug-in Hybrid.
Oh hell no.
Let me just announce that I would very much like to hammer each of the CEO's of these car companies squarely in the balls with a tire iron.
If you don't know what I'm talking about, stop now. Get back in your Prius and follow the rest of the lemmings off the cliff before someone has to euthanize you to protect the rest of the human race.
I'll pick on Ferrari, because I think of all the brands I've mentioned, they probably have the most recognizable name. And probably the most obvious brand cachet. Long ago, I read a line in Automobile that said anything from Italy should be red, fast and wicked. I could name names, but let's keep it siple.
Take a note. Italian. Red. Fast. Wicked.
The words Plug-in hybrid should never, ever, ever coincide with words like Ferrari. In fact, I'll go as far as saying that the first people who put a plug-in hybrid drivetrain in a Ferrari should be hung from a light pole with a rope made from their reusable shopping bags. I think that whomever made the suggestion in the Ferrari board meeting should be dressed in a clown suit, tied to the bumper of a Traubant and dragged to death at its maximum speed. Which has got to be around 25 miles per hour.
Same goes for the lemmings at Maserati, Lotus and Aston Martin. Really, if you think that Prius cache meshes nicely with the Italian Supercar groove, then you're too stupid to be breathing our air.
Let me re-state it for these idiots: Red. Fast. Wicked. Italian supercars should be inaccessible. They should be a little frightening and supremely exciting.
And if you think it's a "Good for Sales" kinda thing, think again. Why the hell do you think Chevy is pulling back production of the Volt? Hint: Because NOBODY WANTS TO BUY THE PIECE OF SHIT.
It would sure be sad if people were saying that about any Ferrari in two or three years.
Apologies in advance. If I don't take this chance to rant, I probably won't sleep tonight.
This has nothing to do with restorations, or Camaros. It has more to do with Gen-Y douche-nozzles, marketing, and why it's good that we don't light people on fire anymore. Or at least, we shouldn't light them on fire. . .
I'm reading the April Automobile, going through what's coming up in the wonderful world of cars nobody can afford. Checking out the new stuff from Maserati, Ferrari, Lotus, Aston Martin, etc. . . And in reading, I see three words that should never be used in conjunction with Maserati, Ferrari, Lotus and Aston Martin.
Plug-in Hybrid.
Oh hell no.
Let me just announce that I would very much like to hammer each of the CEO's of these car companies squarely in the balls with a tire iron.
If you don't know what I'm talking about, stop now. Get back in your Prius and follow the rest of the lemmings off the cliff before someone has to euthanize you to protect the rest of the human race.
I'll pick on Ferrari, because I think of all the brands I've mentioned, they probably have the most recognizable name. And probably the most obvious brand cachet. Long ago, I read a line in Automobile that said anything from Italy should be red, fast and wicked. I could name names, but let's keep it siple.
Take a note. Italian. Red. Fast. Wicked.
The words Plug-in hybrid should never, ever, ever coincide with words like Ferrari. In fact, I'll go as far as saying that the first people who put a plug-in hybrid drivetrain in a Ferrari should be hung from a light pole with a rope made from their reusable shopping bags. I think that whomever made the suggestion in the Ferrari board meeting should be dressed in a clown suit, tied to the bumper of a Traubant and dragged to death at its maximum speed. Which has got to be around 25 miles per hour.
Same goes for the lemmings at Maserati, Lotus and Aston Martin. Really, if you think that Prius cache meshes nicely with the Italian Supercar groove, then you're too stupid to be breathing our air.
Let me re-state it for these idiots: Red. Fast. Wicked. Italian supercars should be inaccessible. They should be a little frightening and supremely exciting.
And if you think it's a "Good for Sales" kinda thing, think again. Why the hell do you think Chevy is pulling back production of the Volt? Hint: Because NOBODY WANTS TO BUY THE PIECE OF SHIT.
It would sure be sad if people were saying that about any Ferrari in two or three years.
Saturday, March 3, 2012
There is no substitute for experience
Well, it's been an interesting day. I've finished trimming and fitting the replacement floor panel, but it should be no surprise that I screwed it all up.
I have a really huge gap where there should be virtually no gap for the butt weld on the transmission hump. 1/8" I could live with, but this gap is much, much worse.
The problem is just my inexperience. I should've run more sheet metal screws, and I should've taken my time. Also, I probably need to modify my rotisserie so I can more easily flip the car completely over onto its back.
Shit. There's a lot of things I could blame it on. Fact is, I just don't know what I'm doing. But that never stopped me before. Won't now, either.

So, on with the fitting. You can see above a dry fit of the panel. I've already trimmed both ends, and notched the outboard flange to accomodate my lap welds. The flange--for those of you who have absolutely no idea what I just said--is this long lip of metal that goes down along another lip running the length of the rocker under the car. That's how the panel attaches.

The next thing to do is clamp down along that flange to get everything to fit flush. I used a combination of vice-grips, C clamps and sheet metal screws to pull it all together. It took some doing, too. The holes you see are where my plug welds will go to secure the panel.
Here's a view of the sheet metal screw thing in the toeboard.

I then tack-welded the panel along the flange, the back and the toeboard. I ran a few screws down the tranny hump, but not nearly enough. And I wasn't nearly careful enough when I trimmed out the excess. That's where my monster gap came from.

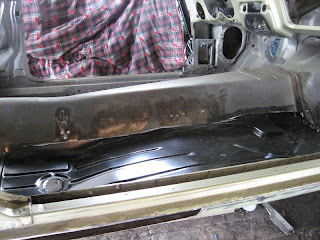
Here's a pic with the butt weld clamps on.

And on the back side.

The gap is horrendous. Almost enough to make me want to scrap it and try another panel. BUT, this is a learning experience, so I'll just buck up and learn how to fix my crass mistake.
I believe the best thing to do is get some nice 1/8" steel filler wire and start to fill the gap just a bit at a time. Shouldn't be difficult, but it will take a lot more time. But most of what I can see online, that's the best suggestion. Besides scrapping the panel and starting over, that is.
Should be fine when I'm done. As long as it's structurally sound, I have no worries about making it look good after welding/grinding. I picked up some Duraglas filler, which will help hide some boo-boos, and add strength to the repairs.
So far, I'm fairly pleased with my progress.
Moving forward, the plan is going to be to move on to the quarter panels after I'm done with the floor. I will do those one at a time. The new quarter panels will be the most expensive part of the bodywork. Possibly the most difficult, as well. We'll see. . .
I have a really huge gap where there should be virtually no gap for the butt weld on the transmission hump. 1/8" I could live with, but this gap is much, much worse.
The problem is just my inexperience. I should've run more sheet metal screws, and I should've taken my time. Also, I probably need to modify my rotisserie so I can more easily flip the car completely over onto its back.
Shit. There's a lot of things I could blame it on. Fact is, I just don't know what I'm doing. But that never stopped me before. Won't now, either.

So, on with the fitting. You can see above a dry fit of the panel. I've already trimmed both ends, and notched the outboard flange to accomodate my lap welds. The flange--for those of you who have absolutely no idea what I just said--is this long lip of metal that goes down along another lip running the length of the rocker under the car. That's how the panel attaches.

The next thing to do is clamp down along that flange to get everything to fit flush. I used a combination of vice-grips, C clamps and sheet metal screws to pull it all together. It took some doing, too. The holes you see are where my plug welds will go to secure the panel.
Here's a view of the sheet metal screw thing in the toeboard.
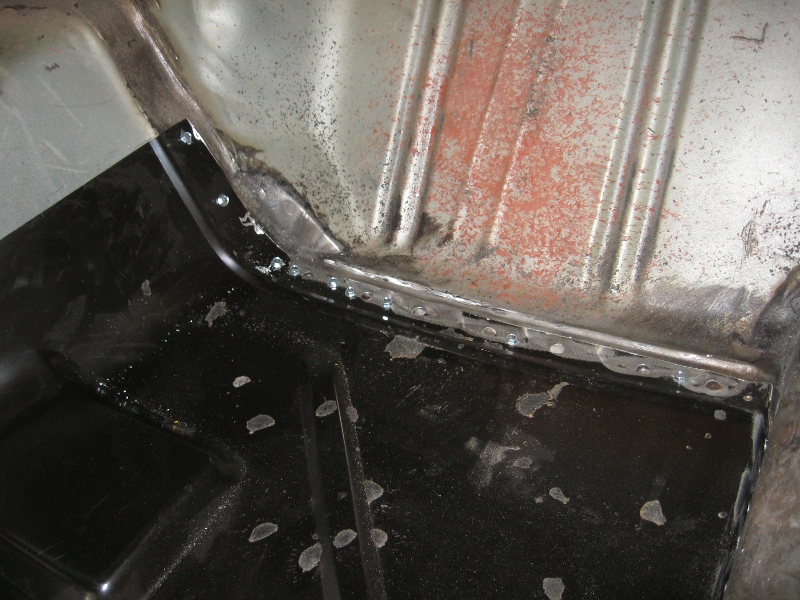
I then tack-welded the panel along the flange, the back and the toeboard. I ran a few screws down the tranny hump, but not nearly enough. And I wasn't nearly careful enough when I trimmed out the excess. That's where my monster gap came from.


Here's a pic with the butt weld clamps on.

And on the back side.

The gap is horrendous. Almost enough to make me want to scrap it and try another panel. BUT, this is a learning experience, so I'll just buck up and learn how to fix my crass mistake.
I believe the best thing to do is get some nice 1/8" steel filler wire and start to fill the gap just a bit at a time. Shouldn't be difficult, but it will take a lot more time. But most of what I can see online, that's the best suggestion. Besides scrapping the panel and starting over, that is.
Should be fine when I'm done. As long as it's structurally sound, I have no worries about making it look good after welding/grinding. I picked up some Duraglas filler, which will help hide some boo-boos, and add strength to the repairs.
So far, I'm fairly pleased with my progress.
Moving forward, the plan is going to be to move on to the quarter panels after I'm done with the floor. I will do those one at a time. The new quarter panels will be the most expensive part of the bodywork. Possibly the most difficult, as well. We'll see. . .
Monday, February 27, 2012
More Floor
OK, I did something stupid with my camera, so no pictures for this post. But I did make some progress this weekend. I finished taking out the seat support, and trimmed out the rest of the hole for the patch in the floor. The patch panel looks like it's going to fit pretty nicely, after some trimming.
I also filled in some of my mistakes with the cutting wheel, and spot weld cutter. Most of that will be covered by the new metal, but needed to be repaired anyway.
Hopefully this time next week I'll have this floor all done up nicely. I picked up some butt-joint clamps from Harbor Freight, but I need to pick up some more channel locks/clamps. I think I'll need at least a half-dozen to clamp that floor in nice and tight.
I'd like a hole-punch. Might have to get one. I'll need to zap some holes in the new panel for plug welds on the lap joints.
Pictures will follow, soon as I can figure out where I put that camera. . .
I also filled in some of my mistakes with the cutting wheel, and spot weld cutter. Most of that will be covered by the new metal, but needed to be repaired anyway.
Hopefully this time next week I'll have this floor all done up nicely. I picked up some butt-joint clamps from Harbor Freight, but I need to pick up some more channel locks/clamps. I think I'll need at least a half-dozen to clamp that floor in nice and tight.
I'd like a hole-punch. Might have to get one. I'll need to zap some holes in the new panel for plug welds on the lap joints.
Pictures will follow, soon as I can figure out where I put that camera. . .
Friday, February 17, 2012
Changed my mind
Well, I changed my mind about that floor panel on the passenger side. It's going to be far simpler to use the whole repair panel, than try to fit a patch. I just don't have a lot of confidence in my ability to cut a decent looking patch this time.

So, I got to cutting the spot-welds. I'll have to remove the passenger seat support, which is probably the toughest part of the job. Besides fitting the panel, that is. I have a picture here of the hole getting larger in the floor--cuting a little bit out at a time is what's needed here. Baby steps.

I also have a picture of the removed inside seat belt support, more as an example of how cutting out the spot welds works. The spot-weld cutter is more or less a tiny hole saw. The trick is to not cut a hole through both panels.

It sucks having to cut perfectly good metal out of the car, but in this case I think it will be better in the end.

So, I got to cutting the spot-welds. I'll have to remove the passenger seat support, which is probably the toughest part of the job. Besides fitting the panel, that is. I have a picture here of the hole getting larger in the floor--cuting a little bit out at a time is what's needed here. Baby steps.

I also have a picture of the removed inside seat belt support, more as an example of how cutting out the spot welds works. The spot-weld cutter is more or less a tiny hole saw. The trick is to not cut a hole through both panels.

It sucks having to cut perfectly good metal out of the car, but in this case I think it will be better in the end.
Subscribe to:
Posts (Atom)