Monday, April 23, 2012

Quarter Panel Replacement

Well, I could've stayed inside and played God of War 2, but that seemed like a terrible waste.  So I rearranged the garage real quick, and got to welding in some temporary body supports.


Before welding in the supports, I leveled the body (you can see the carpenter's level on the package tray), and tack-welded the rotisserie in place.

The role of these supports is to strengthen the body while you remove the quarter panels.  I know a lot of restorers think it's the kiss of death to do the quarters on a rotisserie, but I think it should be OK.  I have a few extra things going my way.

  1. I'll only do one quarter at a time.
  2. I don't have to remove the back panel
  3. I'm going to brace the hell out of it.

The rotisserie is connected to the subframe mounts, and the leaf spring mounts.  I just don't see how that can present any more of a load on the body.  Again, I could be totally wrong.  We shall see.

So now I got no excuse.  I'll order the left-hand quarter and wheelhouse tomorrow.  I'm going to give Classic industries a whirl, and see how their panels stack up to that floor panel I got from Ricks' Camaro.

I'll also go pick up some more 1" square tubing and weld in two more angle braces in there.  May not help that much, but it sure won't hurt, either.


Bumper!

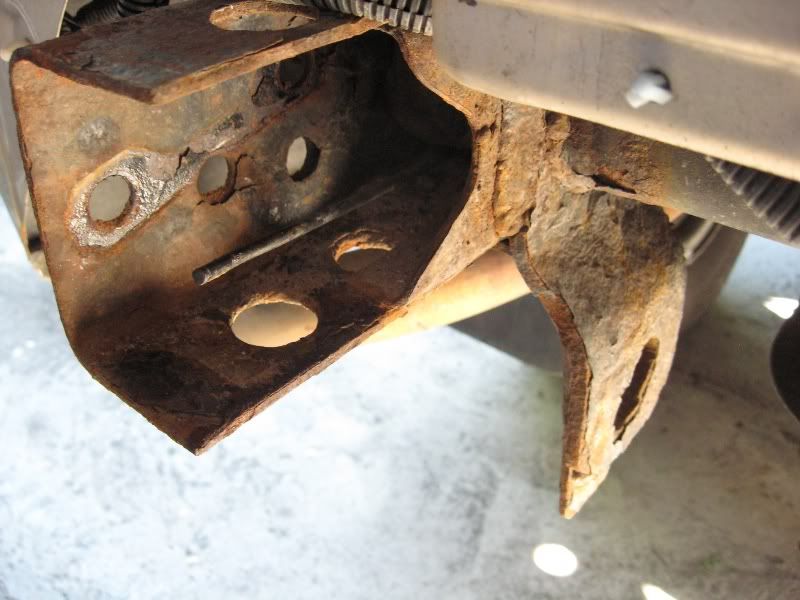
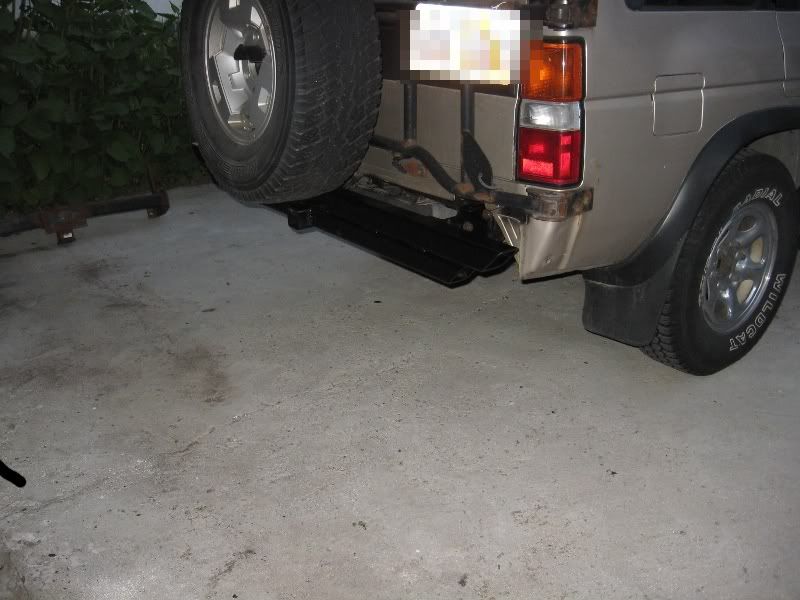
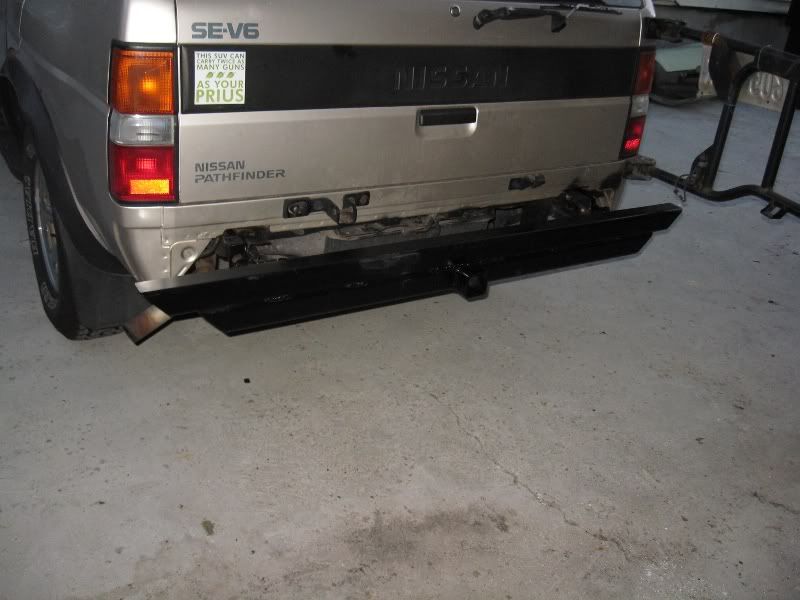
OK, no Camaro work this last weekend.  I had to make a bumper for my Pathfinder, because the original one had pretty much rusted through, and was going to fall clear off.


You can see the tinworm has done its evil work on that frame.  I hate to even think of what else is rusting away under there. . .


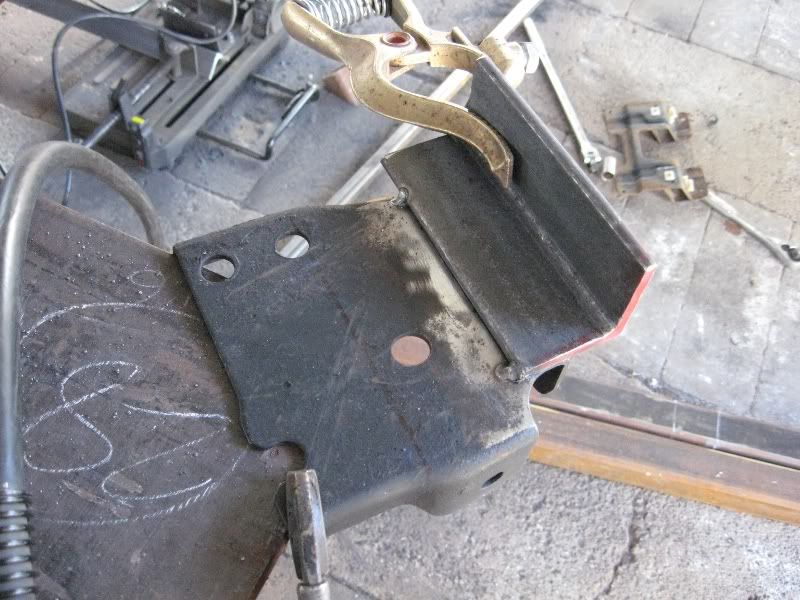
I simply re-used the stock brackets, with a piece of angle iron.


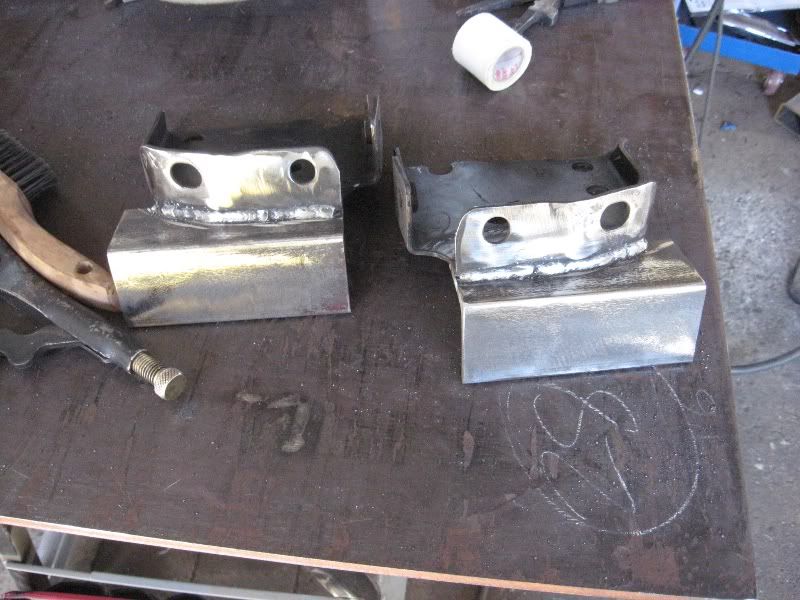
Here are the brackets, all fabbed up, and ready to go.


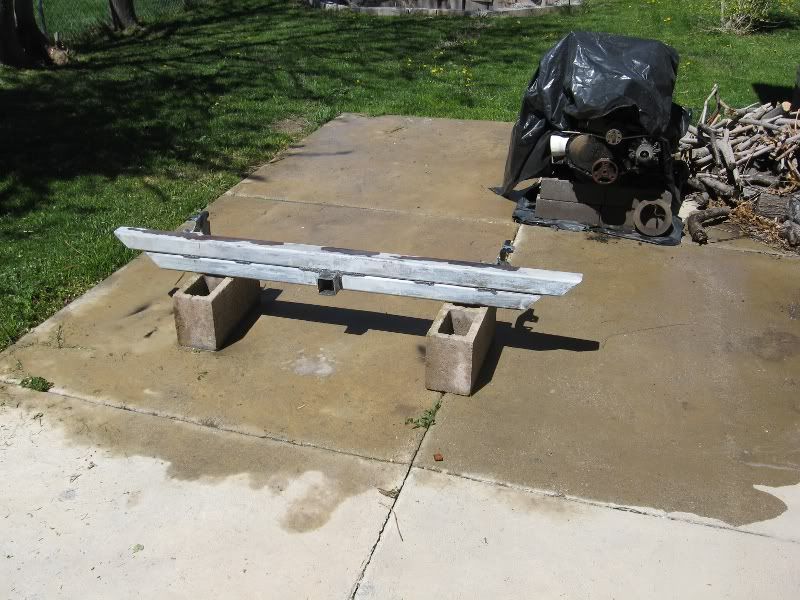
I treated the finished product with etch & prep, and painted with rustoleum enamel.  Not fancy, but should be well protected.


It leaves kind of a big empty spot, but it's heavy and rugged as hell.  Heaven help the person who rear-ends me now.


And, a close-up of that fabulous sticker. . .


I also had to move the spare tire carrier up about 3", but that was easy.

Thursday, April 19, 2012

Undercoating REALLY Sucks

Sorry for the lack of recent postings.  I have just been working on stripping all that old undercoating, and it's really not much fun.

Scraping worked really well for the big stuff, now I'm down to the nooks and crannies.  I finally said screw it and hit it with a wire wheel.  Once you're down to the smaller spots, the wire wheel is great.  Just noisy and tedious.  I'm sure the neighbors hate me right now.

Still haven't found anything chemical that will touch that undercoat.  It's nasty stuff.  I think I'll order a can of the Eastwood undercoating stripper and see if that works.  I'm doubtful, but I'd resort to just about anything short of a blowtorch at this point.  Aircraft stripper doesn't touch it, and neither does oven cleaner.  The most I can notice with both is that it sort of dries out the undercoating, making the top layer marginally easier to strip off with a wheel.

I also picked up one of those small sandblaster guns at Harbor Freight and some glass bead media.  It actually works pretty well.  But I'm finding that I didn't buy nearly enough air compressor for the job.  One of my new missions is to find some kind of 25 to 30 gallon pressure vessel (like a water heater tank) that I can retrofit into a supplementary tank.  Not sure how that will go, but if it's a big expensive hassle, I may just try to sell this compressor and pick up a bigger one.  So word to the wise:  If it seems like it might be big enough, buy one twice that size.

Pics to follow this weekend, I hope.  I will probably try to get some internal bracing welded in for the quarter panel swaps.  I'm seeing a lot of people say, "don't do that on the rotisserie", which makes no sense whatsoever to me.  Supposedly the body is under a different torque load on the rotisserie, which may be true.  But you can't tell me that there's more torque on the body when  you've eliminated about 6 feet of subframe.  I could be dead wrong, but I'm going to go ahead and do the quarters, one at a time, on the rotisserie.  We'll see.

Monday, April 2, 2012

Brake calipers, and Undercoating Sucks

Got the brake calipers cleaned up, but they still need a rust conversion treatment and some paint.  Once painted, they'll look nice and shiny and brand stinking new.


This first picture you can see the nice plastic and rubber bands I used to seal off the bleed screws and the brake line fitting.  The fitting will be replaced, but you don't want any water getting inside that brake caliper.


This next picture you can see the calipers drying.  they fit perfectly on the lip of the gigantic steel deep sink in my basement.  That sink is probably one of the coolest things about this house.  At this moment, the calipers are still there, waiting for me to get off my butt and get them painted.  I need to mask off the piston seals before I hit them with the Metal Prep.  I also found a similar Rustoleum conversion/etch product that I may test on these, just to see how well it works.  I may just get some liquid mask, and use that to protect everything during treatment and painting.  I thought about Vaseline, but that just sounds messy.


That all happened about two weeks ago.  This weekend, I spent the whole day Saturday under the car scraping off the old asphalt-based undercoating.  That stuff is truly evil.  I've tried multiple ways of getting it off.  No solvent seems capable of removing it, although aircraft stripper does seem to eat on it a little bit.  A wire wheel will remove it, but it melts and spatters, and almost makes more of a mess than it's worth.  So I grabbed a paint scraper, and Lo and Behold, it scrapes right off.  There are some tight places that will have to be hit with a wire wheel, but for the most part, scraping seems to be the most effective.  In the pictuer above, you can see the black areas where the undercoating hasn't come off, versus the lighter areas where it has.  I have a thin coat of aircraft stripper on there to help remove the light stuff left from scraping.


This is another good shot of the before and after.  The dark stuff is where I haven't hit it yet.  You can see some nice little rust spots under there, too.  But I haven't found any really nasty surprises yet (knock on wood).

I have it just over halfway done, as far as scraping goes.  I'll still have to clean it down to the paint/metal, rough the surface up, and then get it treated and coated with Metal Prep and POR-15, followed by a coat of black Rustoleum to give the POR-15 some UV protection.  Similar to how I prepped the subframe.


Here's another quick shot of the repaired floor area.  I still have some major cleanup to do here, but it's good for now.  I want to get all that undercoating off before I do much more there.  I still need to grind those welds flush, fill any pinholes, and then apply some Duraglas filler and prep for paint.  But that will probably mostly have to wait until I have the quarter panels done.


Speaking of which, after some cleanup, on the Left side, I did discover that I'll have to replace both the inner and outer wheelhouse--maybe.  It's possible that I could repair the inner wheelhouse.  I'll have to get the quarter off to know for sure.


That's the next phase of the project, then.  Removal and replacement of the driver's side quarter.  But that won't happen until I'm done with this awful undercoating chore.

Thursday, March 29, 2012

Floor

I have the floor welded in, and the gap filled.  There are some small pinholes and things to correct--mostly places where my spot welds didn't join up too well.  Nothing that a few zaps with the Hobart won't fix.

The tough part is going to be finishing work.  I've started grinding everything down, making the seam as invisible as I possibly can without wrecking the repair.

I picked up a small DeWalt air compressor, a D55168.  It had an overwhelming number of positive reviews, and seems like it should be enough to do what I need.  It is a little bit lightweight for constant use of a die grinder--I've found that it has to work a little to keep up.  It's rated at 5 cfm at 90 psi, which is more than enough for the die grinder I picked up.  I haven't picked up an impact wrench yet, but that will be my next tool purchase, I believe.  A half-inch impact wrench would do me wonders.

It's very nice to have some compressed air for cleaning things up, too.  I will have to see if a small sand/soda blaster will work with this compressor.  I may want to get one of those in the near future.

The next major hurdle is going to be the quarter panel replacement.  I still haven't ordered the replacement panels, but that's just a matter of jumping online and placing the order.  I think I'll get the quarters from Classic Industries.  I don't have any real complaints of Rick's Camaro, I just want to see if Classic's are any better.  Supposedly the ones from them are "factory approved", which could end up meaning diddly squat.  There's no significant price difference.

Before moving to the quarters, I am going to try and do a major cleanup of all the old asphalt-based undercoating.  It's a real bear.  Oven cleaner doesn't touch it--and I've tried both hot and cold formulas.  Aircraft stripper has a visible effect, but it's very minor.  I think what I'll have to do is wire-wheel as much of the heavy stuff off as I can, and then go over it with aircraft stripper to finish up with.  That undercoating is nasty.

At very least, I have to clean out the wheel wells.  Part of the quarter panel replacement will be replacing the outer wheel houses.  The inner ones look OK, but I'll have to have it all cleaned up and apart to know if they're truly good-to-go.

Wednesday, March 21, 2012

On the Nature of Rear Ends

The reason that the limited-slip differential I scored at the junkard wouldn't work is complex. . .

For the benefit of potential non-car-person readers, I'd like to explain.  If nothing else, this is a good exercise in remembering this stuff. Anyhoo. . . With these F-bodies, you'll run into two main types of rear axle assemblies:  The 10-bolt, and the 12-bolt.  There are quite a few subdivisions of those two types.

12-bolts are generally stronger, and preferred for cars with more horsepower than sense.  I believe that the early Z-28's had 12-bolts, and probably some (but not all) of the SS models would've had them too.  Certainly all the big-block Camaros would've had them.  12-bolts are getting pretty hard to come by in the junkyard, I guess.  I've never bothered looking for one.  I'm not going to get into 12-bolts, because I simply know less than nothing about them.  I do know that a brand-new one can cost as much as $2,000.  Which is a little stupid, if you ask me.

There are two kinds of 10-bolts, one with an 8.5" carrier, and one with an 8.2" carrier.  My understanding is the 8.5" carrier is the next best thing to a 12-bolt. And can be built up pretty respectable.

NOTE:  You want to know the basic difference between a Chevy 12 and a 10 bolt?  count the number of bolts on the back of the pumpkin.  It's just that easy.

My 10-bolt is the 8.2".  Of course, the poor little thing had almost the smallest available engine (the 235 was smaller, but just).  So there's really no need for a bulletproof rear axle setup.

Now the funny part.  In the 3rd Generation F-bodies (1983-1993), there was born the 7.5" 10-bolt.  Which is why that limited-slip differential wouldn't work in my rear end.  It's just too small.  They also gave birth to a 9-bolt rear end.  But since that's plainly odd-number blasphemy, we won't even acknowledge its existence.

Of course, this is a super-dumbed down version of the real story.  In reality, General Motors created a bewildering amount of variety in these old parts.  Back in the day, the way you bought a car was by going through a big hairy form, and checking all the boxes of the stuff you wanted on the car.  They were customized in a way that simply isn't done anymore.  These days you get one or two choices of package groups, and very few real options.

What that means is that there are literally thousands of variations in the old stuff.  And they can be very subtle.

More importantly, what am I going to do with the rear axle in my car?  Probably nothing.  If I could find a limited-slip that would work, for cheap, I'd grab it up.  But I'm not about to dump down $500 for a new differential.  Not yet, anyhow.  I'll continue to troll the junkyards.  If I get lucky and find a positraction 12-bolt, I'll be snatching that thing up.  But I ain't holding my breath.

If I do end up swapping in a late-model 4200 Vortec--which is sincerely the route I'd like to go--then I would likely have to upgrade that rear axle to handle the extra power.

It's pretty interesting.  There were 8 different factory engines available for the Camaro in the '68 model year:


L26                230cid                    140hp
L22                250cid                    160hp
LF7                327cid                    210hp
L30                327cid                     275hp
L48                350cid                     295hp
L35                396cid                     325hp
L78/79           396cid                     375hp
Z28                302cid                     290hp

You can see, my 250 is nearly at the bottom of the heap.  However, if I were to swap with a 2006-2009 LL8 (the 4200 Vortec), it's about 254 cubic inches, which is super close to mine.  But those engines are conservatively rated around 300 horsepower.  Which would put me performance-wise right between the 350 and big-block 396.  AND solidly drop me into the 25 to 30 mpg range, which no stock first-gen F-body can touch.  Not even the wheezy L26.

Getting 300 horsepower out of my L22 is certainly possible, but would end up being far more expensive and time consuming than the 4200 swap (at least by my estimates)  Plus, it would still never touch that fuel economy.

Want another funny bit of trivia?  A 2012 V-6 Toyota Camry is rated at 268 horsepower.  Not much down from the top of the heap 396 in '68.  Except that the 396 probably never got more than 8 or 10 miles per gallon.

More Floor

The floor repair goes well.  I have created much more work for myself than necessary, but I'll chalk it up to needed training.

Here's a couple pics of the progress.  You can see I still have much to do, but it's coming along.


Another part of this process is removing the old asphalt-based undercoating.  My intention is to recoat the underside with something prettier, more durable and easier to work with.  Removal of this stuff is a certifiable bitch.


Here you can see some of the mess.  I've sprayed a liberal layer of Easy Off cold oven cleaner, which does have some small effect on the undercoating.  Aircraft stripper works OK, but is far more expensive.  I've also resorted to heating a scraper with a propane torch and melting the stuff off.  You have to be careful doing that, because the undercoating is dramatically flammable.